Toasty Baked Italian Sub Sandwich Recipe

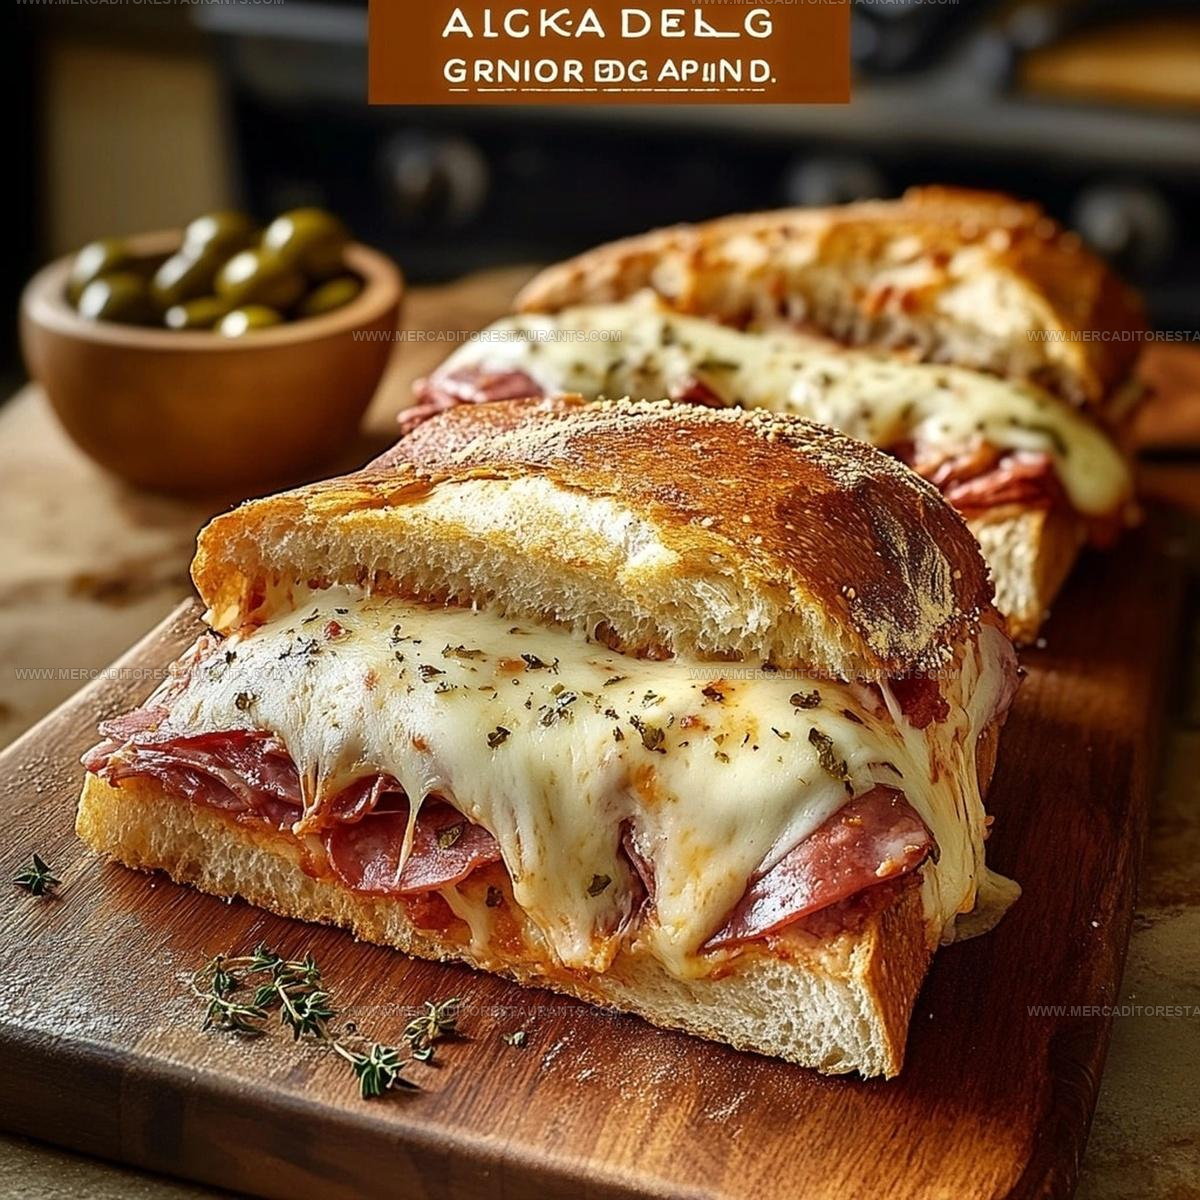
Italian Sub Sandwich Recipe with Bold Baked Flavor

Toasty baked Italian sub sandwiches deliver all the satisfaction of deli classics with a warm, melted twist that makes lunch or dinner feel special.

Something about that contrast between crispy bread and gooey, seasoned fillings creates comfort food magic in minutes.

When you crave bold flavors packed into handheld form, few options compare to this crowd-pleasing favorite.

Perfect for casual gatherings, game days, or weeknight meals when cooking feels like too much effort, this sandwich works beautifully for any occasion.

The beauty lies in how quickly it comes together while still feeling indulgent and memorable.

Even picky eaters tend to devour every last bite, making it a reliable option for feeding groups.

Whether you need a simple solo meal or something to feed a hungry crowd, this recipe won't disappoint.

What Makes a Baked Italian Sub Sandwich So Satisfying

What Makes a Baked Italian Sub Sandwich So Satisfying
  • Super Simple Sandwich: These loaded subs come together faster than grabbing takeout, and your whole crew will appreciate how quick and satisfying they are.
  • Crowd-Pleasing Flavor Combo: The mix of meats, peppers, and cheese creates an epic taste that feels like a deli sandwich right from your kitchen, making everyone happy.
  • Customizable Comfort Food: Each person can swap ingredients based on their preferences, so picky eaters and adventurous family members both get exactly what they want.
  • Zero Complicated Techniques: No fancy culinary skills needed – just layer, brush, and bake, which means even cooking newbies can nail this recipe without stress.

Ingredients Used in Baked Italian Sub Sandwich

Sandwich Base:
  • Sub Rolls (4): Your foundation for this hearty sandwich, choose hoagie or classic sub rolls with a soft interior.
Meats:
  • Salami (1/4 lb): A savory Italian classic that adds rich flavor to your sandwich.
  • Ham (1/4 lb): Tender and mild, perfect for balancing the other bold meats.
  • Pepperoni or Capicola (1/4 lb): Spicy option that brings a zesty kick to your sandwich.
  • Roast Beef (1/4 lb, optional): Extra protein to make your sandwich more substantial.
Cheese and Toppings:
  • Provolone or Mozzarella Cheese (8 slices): Melty cheese that binds the meats together.
  • Banana Peppers or Pepperoncini (1/2 cup, sliced): Tangy peppers that provide a bright, zinging contrast.
  • Red Onion (1/4 cup, thinly sliced): Sharp flavor that cuts through the richness of the meats.
Seasoning and Finishing:
  • Italian Dressing (1/2 cup): Adds moisture and classic Italian flavor to the sandwich.
  • Butter (2 tablespoons, melted): Creates a golden, slightly crisp exterior on your rolls.
  • Italian Seasoning (1 tablespoon): Herbal blend that enhances the overall taste profile.
  • Garlic Powder (1/2 teaspoon): Provides a subtle, aromatic background note.

Tools Used for Baked Italian Sub Sandwiches

  • Large Baking Sheet: Your go-to surface for assembling and baking these hearty subs, ensuring everything stays neat and organized.
  • Sharp Knife: Perfect for slicing sub rolls and cutting sandwiches cleanly after baking.
  • Cutting Board: Provides a stable surface for prepping ingredients and slicing rolls.
  • Small Mixing Bowl: Ideal for combining melted butter, Italian seasoning, and garlic powder to brush over your subs.
  • Pastry Brush: Helps you evenly coat the rolls with seasoned butter for maximum flavor.
  • Aluminum Foil: Essential for wrapping subs before baking, keeping them moist and helping ingredients meld together.
  • Measuring Spoons: Ensures precise amounts of seasonings for consistent taste.

How to Bake the Ultimate Italian Sub

How to Bake the Ultimate Italian Sub
1

Prep Rolls

Grab those sub rolls and slice them carefully down the middle, keeping the bottom connected like a little boat. I recommend opening them up gently so they can hold all the delicious fillings without falling apart. A quick toast on the inside will give them a nice crisp texture.

2

Meat Layer Magic

Time to build your flavor foundation. Grab your deli meats and start layering them inside the rolls. Here’s how I stack them:

  • ¼ lb ham
  • ¼ lb salami
  • ¼ lb pepperoni
  • ¼ lb roast beef (totally optional but super tasty)

Next, tuck in those cheese slices between the meat layers. Sprinkle some:

  • ½ cup banana peppers
  • ¼ cup red onion
3

Season and Prepare

Mix up your flavor boost in a small bowl. Combine:

  • 2 tablespoons melted butter
  • 1 tablespoon Italian seasoning
  • ½ teaspoon garlic powder

Brush this mixture generously over the top of each roll. Drizzle some Italian dressing inside for extra zing.

4

Wrap and Bake

Wrap each sub tightly in aluminum foil. Pop them into a preheated oven at 375°F for exactly 15 minutes. This will melt the cheese and warm everything perfectly.

5

Serve Immediately

Pull those hot subs out of the oven, unwrap carefully, and serve right away. The aroma will have everyone rushing to the table!

Which Are the Best Tips for Baked Italian Sub Sandwiches

Which Are the Best Tips for Baked Italian Sub Sandwiches
  • Slice your sub rolls carefully, keeping them connected like a soft book. Toasting the inside adds a delightful crunch that makes every bite better.
  • Layer meats generously, allowing cheese slices to nestle between them. This ensures each mouthful delivers maximum flavor and texture.
  • Whisk melted butter with Italian seasoning and garlic powder to create a mouthwatering glaze. Brush it generously over your sandwich tops for an extra tasty finish.
  • Drizzle a touch of Italian dressing inside each sandwich to keep the filling juicy and add a tangy kick that elevates the entire experience.
  • Wrap these beauties in foil and bake at 375°F for about 15 minutes. The result? Perfectly melted cheese and piping hot fillings that make everyone smile.

Baked Italian Sub Sandwich Flavor Variations

  • Veggie-Packed Sub: Swap out meats for grilled portobello mushrooms, roasted zucchini, and marinated artichoke hearts. Keep the cheese and peppers for extra flavor, then follow the same baking method.
  • Gluten-Free Friendly: Use gluten-free sub rolls or hollowed-out zucchini boats instead of traditional bread. Ensure all your ingredients are certified gluten-free to make the sandwich safe for sensitive diners.
  • Lean Protein Swap: Replace higher-fat meats with sliced turkey breast, rotisserie chicken, or thinly sliced grilled steak. This version cuts calories but keeps all the delicious sandwich satisfaction.
  • Mediterranean Remix: Trade standard deli meats for lamb slices, swap Italian seasoning with dried oregano, and add crumbled feta cheese instead of sliced varieties. A quick flavor transformation that feels like a culinary adventure.

How to Serve Baked Italian Sub Sandwiches

  • Slice with Care: Cut your sub rolls gently, keeping them connected like a cozy book. This helps hold all those delicious layers together.
  • Layer Like a Pro: Stack meats and cheese generously, letting each slice peek out. Your sandwich deserves to look as amazing as it tastes.
  • Butter Brush Magic: Blend melted butter with Italian seasoning and garlic powder. Coating the roll tops creates a golden, fragrant crust that makes everyone’s mouth water.
  • Serve Fresh and Hot: Pull these subs straight from the oven and slice them quickly. Serve immediately so your guests catch that perfect melty, steamy moment.

Italian Sub Sandwich Storage Tips

  • Wrap those loaded subs super tight in aluminum foil to keep all the delicious juices locked inside when storing leftovers in the refrigerator.
  • Cool sandwiches completely before sealing them in an airtight container, which helps prevent soggy bread and maintains that perfect texture.
  • Refrigerated subs stay fresh for 2-3 days, so plan your munching accordingly and reheat gently in the oven to restore that just-baked warmth.
  • When freezing, wrap each sub individually in plastic wrap, then place inside a freezer bag to prevent freezer burn and preserve those amazing flavors.

Baked Italian Sub Sandwich Common Questions

FAQ

Can I use different meats in the sub rolls?

Absolutely! Swap out meats based on what’s in your fridge. Turkey, chicken, or even roast pork work great as alternatives.

FAQ

How do I prevent my rolls from getting soggy?

Toast the inside of your rolls lightly and avoid adding too much liquid dressing. This helps keep the bread crisp and delicious.

FAQ

Are these subs good for meal prep?

These baked subs are best enjoyed fresh, but you can prep the ingredients ahead of time and assemble quickly before baking.

FAQ

Can I make these for a crowd?

Definitely! These subs are perfect for feeding a group. Just increase the ingredients and prepare multiple foil packets.

FAQ

What if I don’t have Italian seasoning?

No worries! Mix dried oregano, basil, thyme, and a pinch of rosemary as a quick substitute.

FAQ

Can I make these vegetarian?

Replace the meats with grilled vegetables like zucchini, bell peppers, and mushrooms for a tasty veggie version.

Print
clock clock iconcutlery cutlery iconflag flag iconfolder folder iconinstagram instagram iconpinterest pinterest iconfacebook facebook iconprint print iconsquares squares iconheart heart iconheart solid heart solid icon
Toasty Baked Italian Sub Sandwich Recipe

Toasty Baked Italian Sub Sandwich Recipe


5 Stars 4 Stars 3 Stars 2 Stars 1 Star

4.5 from 23 reviews

  • Total Time: 25 minutes
  • Yield: 4 1x

Description

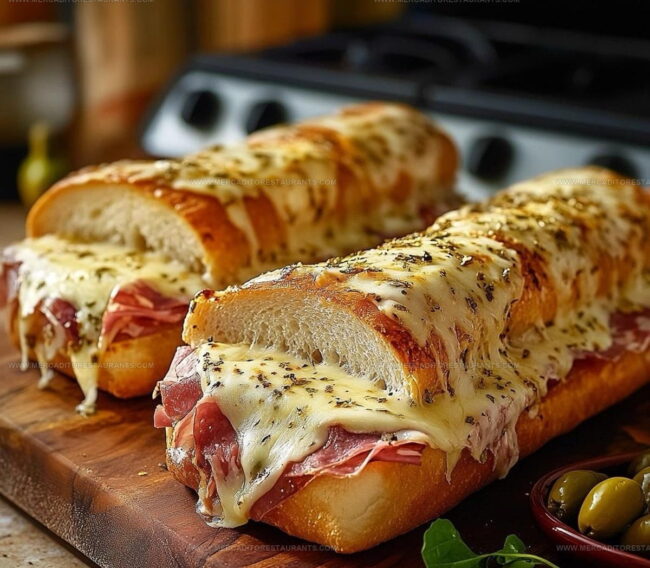
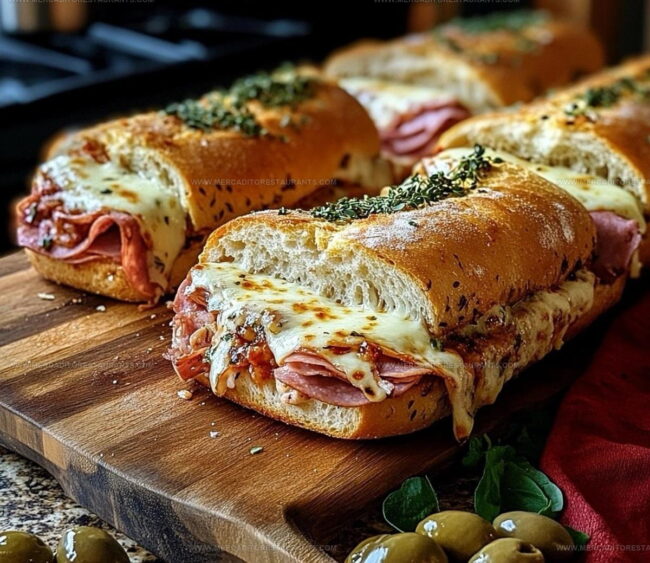
Loaded with Italian meats, cheese, and zesty toppings, this Baked Italian Sub Sandwich delivers maximum flavor in one epic bite. Crispy bread, melted provolone, and savory salami create a classic sandwich that’ll have your taste buds dancing with pure satisfaction.


Ingredients

Scale

Main Proteins:

  • ¼ lb salami
  • ¼ lb ham
  • ¼ lb pepperoni or capicola
  • ¼ lb roast beef

Bread and Cheese:

  • 4 sub rolls or hoagie buns
  • 8 slices provolone or mozzarella cheese

Seasonings and Condiments:

  • ½ cup banana peppers or pepperoncini
  • ¼ cup red onion
  • ½ cup Italian dressing
  • 2 tablespoons butter
  • 1 tablespoon Italian seasoning
  • ½ teaspoon garlic powder

Instructions

  1. Slice 4 sub rolls or hoagie buns lengthwise, keeping the bottom intact. This creates a pocket for your hearty fillings.
  2. Brush the interior of each roll with melted butter mixed with 1 tablespoon Italian seasoning and ½ teaspoon garlic powder for extra flavor.
  3. Layer ¼ lb ham across the bottom of each roll, ensuring even coverage.
  4. Add ¼ lb salami on top of the ham, creating a second meat layer.
  5. Place ¼ lb pepperoni or capicola over the salami, continuing the meaty foundation.
  6. Optional: Add ¼ lb roast beef for additional protein and richness.
  7. Distribute 2 slices of provolone or mozzarella cheese between the meat layers.
  8. Scatter ½ cup sliced banana peppers across the sandwich.
  9. Sprinkle ¼ cup thinly sliced red onion over the peppers for a sharp bite.
  10. Drizzle ½ cup Italian dressing generously inside each roll.
  11. Wrap each prepared sub tightly in aluminum foil.
  12. Bake at 375°F for exactly 15 minutes to melt the cheese and heat the ingredients thoroughly.
  13. Remove from oven, unwrap carefully, and slice diagonally before serving hot.

Notes

  • Toasting the roll insides creates a sturdy base that prevents soggy bottoms and adds delightful crunch.
  • Wrapping in foil helps steam the sandwich, ensuring each bite stays moist and the cheese melts perfectly.
  • For a low-carb version, swap sub rolls with large lettuce leaves or low-carb tortillas to keep the same delicious flavor profile.
  • When selecting deli meats, ask for thin slices that layer easily and melt beautifully with the cheese.
  • Prep Time: 10 minutes
  • Cook Time: 15 minutes
  • Category: Baked
  • Method: Baking
  • Cuisine: Italian-American

Nutrition

  • Serving Size: 4
  • Calories: 460 kcal
  • Sugar: 3 g
  • Sodium: 1150 mg
  • Fat: 30 g
  • Saturated Fat: 12 g
  • Unsaturated Fat: 16 g
  • Trans Fat: 0.5 g
  • Carbohydrates: 35 g
  • Fiber: 2 g
  • Protein: 28 g
  • Cholesterol: 70 mg
Daniel Navarro

Daniel Navarro

Culinary Content Director

Expertise

Mexican-inspired Menus, Seasonal Restaurant Specials, Shared Plate Dining, Tequila Pairings, Chef-driven Recipes

Education

City Colleges of Chicago
  • Program: Culinary Arts, Associate in Applied Science
  • Focus: Trained in hands-on food production in a commercial food-service setting, with coursework that covers culinary technique, ethnic and classical menus, business planning, cost control, and merchandising.

Daniel writes about bold flavors, chef-driven dishes, and the kind of restaurant moments that turn tacos, mezcal, and shared plates into a night worth repeating.

Leave a Reply

Your email address will not be published. Required fields are marked *

Recipe rating 5 Stars 4 Stars 3 Stars 2 Stars 1 Star