Sushi Bake (Canned Salmon) Recipe

Baked Sushi Recipe Using Everyday Canned Salmon

Sushi bake with canned salmon promises a delightful fusion of comfort and creativity.

Craving something extraordinary that breaks away from traditional sushi preparation? Unexpected and wildly popular, this dish combines the best elements of rolled sushi with a casserole-style approach.

Home cooks everywhere are falling in love with its simplicity and bold flavors.

Perfect for gatherings or solo enjoyment, the recipe offers a playful twist on classic Japanese-inspired cuisine.

Layered with rich textures and satisfying components, sushi bake transforms ordinary ingredients into something spectacular.

Preparing this dish will unleash your inner culinary adventurer and impress everyone at the table.

Why Sushi Bake With Canned Salmon Stands Out

Why Sushi Bake With Canned Salmon Stands Out
  • Quick Comfort: This sushi bake transforms boring canned salmon into a seriously delicious meal that makes dinner feel special without complex techniques.
  • Pantry Hero: Grab standard ingredients from your kitchen shelves and create a restaurant-worthy dish that beats takeout without complicated shopping trips.
  • Flexible Feast: Customize your salmon layer with whatever hot sauce or mayo you have on hand, making this recipe perfect for cleaning out your refrigerator.
  • Social Star: This shareable dish brings everyone together, letting friends and family scoop and assemble their own bites on crispy seaweed sheets for a fun, interactive meal.

Core Ingredients for Sushi Bake With Canned Salmon

Rice Layer:
  • Sushi Rice (2 cups): Short-grain rice creates the perfect sticky base for your sushi bake. This rice holds everything together beautifully.
  • Rice Vinegar (2 tbsp): Adds a tangy flavor that makes your rice taste authentically Japanese.
  • Sugar (1 tbsp): Balances the vinegar’s sharp taste and brings subtle sweetness.
  • Salt (1/2 tsp): Enhances all the other flavors in your rice layer.
Salmon Layer:
  • Canned Salmon (14 oz): The star protein that makes this dish hearty and delicious. Drain and flake for the best texture.
  • Kewpie Mayo (1/4 cup): Creamy Japanese-style mayo that adds rich, silky smoothness to your salmon mix.
  • Sriracha (1/2 tbsp): Brings a gentle kick of heat you can adjust to your spice preference.
  • Soy Sauce (1 tsp): Adds deep, savory umami flavor to the salmon mixture.
  • Sesame Oil (1 tsp): Introduces a nutty, aromatic essence that elevates the entire dish.
Toppings:
  • Furikake (1/2 tbsp), Green Onions (2 tbsp), Optional: Avocado Slices, Cucumber Slices, Sesame Seeds: These garnishes add crunch, freshness, and extra layers of flavor to your sushi bake.
Serving Accompaniments:
  • Roasted Seaweed Sheets (Nori): Perfect for wrapping or scooping your sushi bake.
  • Soy Sauce or Eel Sauce: For drizzling and adding extra flavor.
  • Optional: Pickled Ginger: A classic palate cleanser that pairs wonderfully with the rich salmon.

Equipment You’ll Use for Salmon Sushi Bake

  • 8×8 or 9×9 Baking Dish: Your perfect canvas for layering rice and salmon mixture, ensuring even cooking and easy serving.
  • Mixing Bowls (Medium-Sized): Essential for blending salmon ingredients and creating that creamy, flavorful filling.
  • Wooden Spoon or Spatula: Helps you mix ingredients smoothly and spread layers evenly without sticking.
  • Measuring Cups and Spoons: Precise tools for getting your rice vinegar, sugar, and sauce measurements just right.
  • Rice Cooker or Pot: Crucial for preparing perfectly cooked sushi rice with the right texture.
  • Cutting Board: Provides a clean surface for chopping green onions and prepping optional toppings.
  • Sharp Knife: Needed for slicing green onions and cutting your finished sushi bake into neat portions.
  • Oven Mitts: Protect your hands when handling hot baking dishes straight from the oven.

Cooking Method for Sushi Bake with Canned Salmon

Cooking Method for Sushi Bake with Canned Salmon
1

Prepare Rice

Cook 2 cups of sushi rice according to the package instructions. While it’s still warm, gently fold in 2 tbsp rice vinegar, 1 tbsp sugar, and 1/2 tsp salt. Spread the seasoned rice evenly into a greased 8×8 or 9×9 inch baking dish, creating a smooth base layer.

2

Create Salmon Mixture

Grab a mixing bowl and combine the salmon ingredients:

  • 1 can (14 oz) salmon, drained and flaked
  • 1/4 cup Kewpie mayo
  • 1/2 tbsp sriracha
  • 1 tsp soy sauce
  • 1 tsp sesame oil

Stir everything together until the mixture becomes creamy and well-blended.

3

Layer and Top the Dish

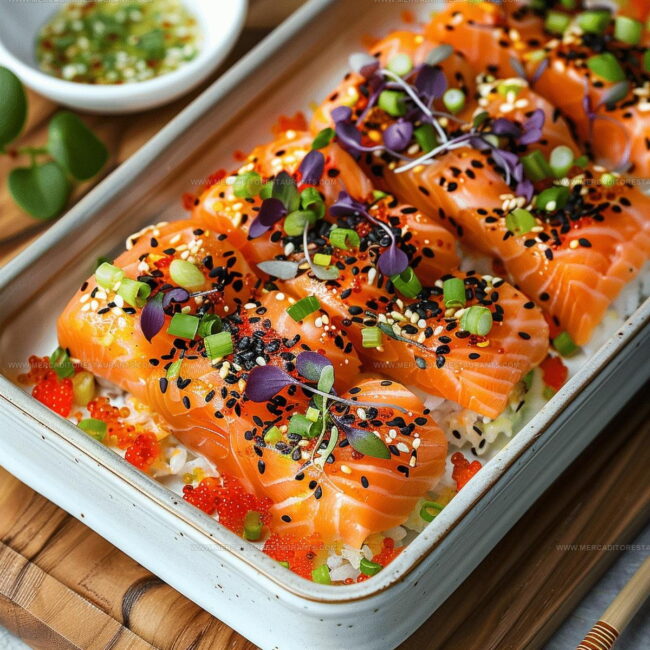
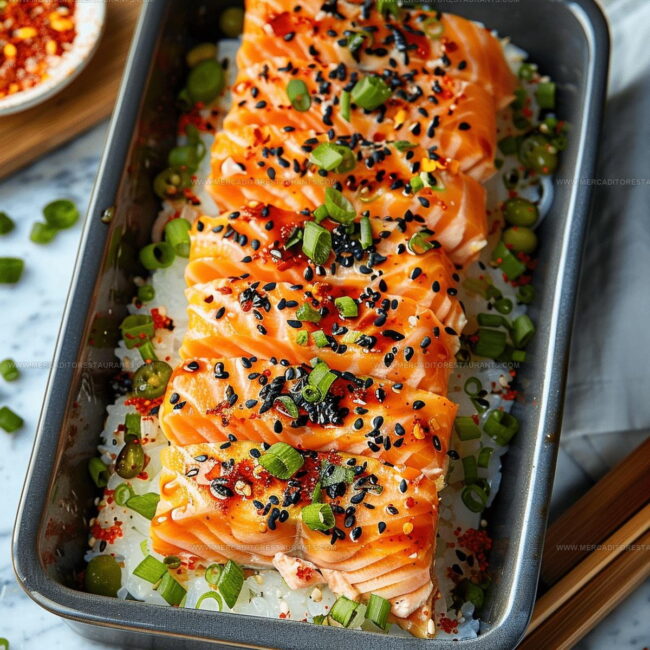
Carefully spread the salmon mixture over your prepared rice base. Sprinkle the top generously with 1/2 tbsp furikake and 2 tbsp chopped green onions. If you’re feeling adventurous, add some sliced avocado or cucumber on top.

4

Bake to Perfection

Slide your baking dish into a preheated oven at 375°F. Bake for 15-18 minutes until the top turns a light golden color and the entire dish is heated through.

5

Serve and Enjoy

Scoop the warm sushi bake onto crisp roasted seaweed sheets. For an extra flavor kick, drizzle with soy sauce or eel sauce. Grab a fork and dig in while it’s hot!

Key Details That Matter For Sushi Bake Using Canned Salmon

Key Details That Matter For Sushi Bake Using Canned Salmon
  • Press your sushi rice into the baking dish firmly and evenly to create a solid, compact base that holds together perfectly when serving.
  • Blend the canned salmon with Kewpie mayo and seasonings until super smooth, ensuring no large salmon chunks disrupt your creamy texture.
  • Sprinkle furikake generously across the top for a savory, umami-packed crunch that elevates the entire dish’s flavor profile.
  • Watch your sushi bake closely during those final minutes to achieve a golden, slightly crispy top without overcooking the delicate salmon layer.
  • Warm nori sheets make the perfect vessel for scooping and rolling your sushi bake, creating a hands-on, interactive dining experience.

Flexible Options For Sushi Bake With Canned Salmon

  • Tuna Swap: Replace canned salmon with drained canned tuna for a quick protein change that keeps the same creamy texture.
  • Vegan Reimagine: Swap salmon for mashed tofu with nutritional yeast and nori flakes, adding extra seasoning to create a plant-based version that still delivers rich flavor.
  • Low-Carb Alternative: Substitute rice base with cauliflower rice, keeping all other ingredients the same for a lighter, grain-free option that fits keto preferences.
  • Spicy Kick Version: Increase sriracha or add chopped jalapeños to the salmon mixture for extra heat that transforms the original recipe’s mild profile.

Best Serving Options For Salmon Sushi Bake

  • Serving Suggestion: Scoop this sushi bake onto crisp nori sheets for a hand-held treat that feels like a flavor explosion in your mouth.
  • Perfect Portion: Divide the baking dish into 4-6 generous sections, depending on how hungry your friends and family are feeling.
  • Delicious Side Pairing: Whip up a quick cucumber salad with rice vinegar and sesame seeds to brighten up the rich salmon flavors.
  • Smart Leftover Strategy: Store any remaining bake in an airtight container and reheat in the oven to keep the crispy top texture intact.

How To Store Sushi Bake With Canned Salmon

  • Keep leftover sushi bake sealed in an airtight container in the refrigerator for up to 3 days, making sure to store it quickly after cooling down completely.
  • Separate the rice and salmon layers when storing to prevent soggy textures, placing them in different containers if possible.
  • When reheating, add a splash of water before microwaving to help restore moisture and prevent the dish from drying out.
  • Freeze individual portions in freezer-safe containers for up to 1 month, wrapping tightly to prevent freezer burn and maintain the best flavor.

Salmon Sushi Bake Q&A

FAQ

What’s the difference between sushi bake and traditional sushi?

Sushi bake is like a deconstructed sushi casserole where you can scoop the ingredients onto nori sheets instead of rolling them traditionally. It’s much easier to make at home and perfect for feeding a crowd.

FAQ

Can I use fresh salmon instead of canned?

Absolutely fresh salmon works great! Just make sure to cook and flake it first before mixing with the other ingredients. Canned salmon is convenient, but fresh gives an amazing flavor boost.

FAQ

Is furikake necessary for this recipe?

Furikake adds incredible umami and texture, but if you can’t find it, sesame seeds or nori strips make fantastic alternatives. The dish will still taste delicious.

FAQ

How spicy is this version with sriracha?

The sriracha adds a mild kick that’s not overwhelming. Feel free to adjust the amount based on your heat tolerance. Start with less and add more if you want extra spice.

FAQ

What makes Kewpie mayo different from regular mayo?

Kewpie mayo is richer and tangier with a silkier texture. It’s made with egg yolks instead of whole eggs, creating a more luxurious flavor that elevates the salmon mixture.

Print
clock clock iconcutlery cutlery iconflag flag iconfolder folder iconinstagram instagram iconpinterest pinterest iconfacebook facebook iconprint print iconsquares squares iconheart heart iconheart solid heart solid icon
Sushi Bake (Canned Salmon) Recipe

Sushi Bake (Canned Salmon) Recipe


5 Stars 4 Stars 3 Stars 2 Stars 1 Star

4.6 from 14 reviews

  • Total Time: 30-33 minutes
  • Yield: 4 1x

Description

Sushi bake brings Japanese-inspired comfort straight to your kitchen, turning canned salmon into a crowd-pleasing casserole that’s quick to assemble. Creamy, crispy layers combine for a delightful twist on traditional sushi that’s perfect for sharing with friends and family.


Ingredients

Scale

Main Components:

  • 2 cups sushi rice
  • 1 can (14 oz) salmon

Binding and Flavor Enhancers:

  • ¼ cup Kewpie mayo
  • 2 tablespoons rice vinegar
  • ½ tablespoon sriracha
  • 1 tablespoon sugar
  • 1 teaspoon soy sauce
  • 1 teaspoon sesame oil
  • ½ teaspoon salt

Garnishes and Optional Toppings:

  • ½ tablespoon furikake
  • 2 tablespoons green onions
  • Roasted seaweed sheets
  • Avocado slices
  • Cucumber slices
  • Sesame seeds
  • Pickled ginger
  • Soy sauce
  • Eel sauce

Instructions

  1. Cook 2 cups of sushi rice at medium heat for 18-20 minutes. Drain excess water and let cool for 5 minutes.
  2. Mix 2 tbsp rice vinegar, 1 tbsp sugar, and ½ tsp salt into warm rice. Press mixture evenly into a greased 8×8 inch baking dish.
  3. Drain 1 can of salmon thoroughly. Combine salmon with ¼ cup Kewpie mayo, ½ tbsp sriracha, 1 tsp soy sauce, and 1 tsp sesame oil in a mixing bowl.
  4. Spread salmon mixture smoothly across your prepared rice layer using a spatula. Ensure complete and even coverage.
  5. Sprinkle ½ tbsp furikake and 2 tbsp chopped green onions across the salmon layer. Add optional avocado or cucumber slices if desired.
  6. Place baking dish in a preheated oven at 375°F. Bake for 15-18 minutes until the top becomes lightly golden and edges look crispy.
  7. Remove dish from oven. Let cool for 3-4 minutes to prevent burning your mouth.
  8. Serve immediately by scooping onto roasted seaweed sheets. Drizzle with soy sauce or eel sauce for extra flavor.

Notes

  • Choose full-fat canned salmon for the richest flavor and most tender texture in your sushi bake.
  • Drain salmon thoroughly to prevent excess liquid from making your dish soggy and compromising the creamy consistency.
  • Adjust the sriracha amount to match your personal spice preference, starting with a small quantity and tasting as you mix.
  • Seaweed sheets can transform this bake into portable hand rolls, making it perfect for quick lunches or casual gatherings.
  • Prep Time: 15 minutes
  • Cook Time: 15-18 minutes
  • Category: Baked
  • Method: Baking
  • Cuisine: Japanese

Nutrition

  • Serving Size: 4
  • Calories: 290 kcal
  • Sugar: 3 g
  • Sodium: 950 mg
  • Fat: 18 g
  • Saturated Fat: 3 g
  • Unsaturated Fat: 13 g
  • Trans Fat: 0 g
  • Carbohydrates: 20 g
  • Fiber: 1.5 g
  • Protein: 17 g
  • Cholesterol: 30 mg
Daniel Navarro

Daniel Navarro

Culinary Content Director

Expertise

Mexican-inspired Menus, Seasonal Restaurant Specials, Shared Plate Dining, Tequila Pairings, Chef-driven Recipes

Education

City Colleges of Chicago
  • Program: Culinary Arts, Associate in Applied Science
  • Focus: Trained in hands-on food production in a commercial food-service setting, with coursework that covers culinary technique, ethnic and classical menus, business planning, cost control, and merchandising.

Daniel writes about bold flavors, chef-driven dishes, and the kind of restaurant moments that turn tacos, mezcal, and shared plates into a night worth repeating.

Leave a Reply

Your email address will not be published. Required fields are marked *

Recipe rating 5 Stars 4 Stars 3 Stars 2 Stars 1 Star