
Creamy Shoepeg Casserole Recipe for Family Dinners
Shoepeg casserole has been a comforting favorite at potlucks and family dinners across the South for generations.
Creamy, cheesy, and satisfying, it's the kind of dish that disappears fast from the table.
You can count on it to please a crowd without spending hours in the kitchen.
The golden, bubbly top and rich layers make it feel special enough for holidays yet simple enough for busy weeknights.
Everyone from picky eaters to adventurous food fans finds something to love in every bite.
It pairs beautifully with roasted meats, grilled chicken, or a simple salad.
Make room on the menu for a side dish that never fails to impress.
Why Shoepeg Casserole Belongs On Your Menu
What Goes Into Shoepeg Casserole
Main Ingredients:Supporting Ingredients:Simple Kitchen Equipment for Shoepeg Casserole
Steps for Making Shoepeg Casserole
Prepare the Oven
Crank up your oven to 350°F and grab an 8×8 baking dish. Give it a quick spray or butter rub to prevent sticking.
Chop and Prep Vegetables
Dice up your veggies with care – you’ll need:
Mix the Casserole Base
Grab a big mixing bowl and combine these ingredients:
Stir everything together until it looks smooth and well-blended. Sprinkle in some salt and pepper to wake up the flavors.
Transfer to Baking Dish
Pour your veggie mixture into the prepared baking dish. Spread it out evenly so every bite gets the same delicious mix.
Add Cracker Topping
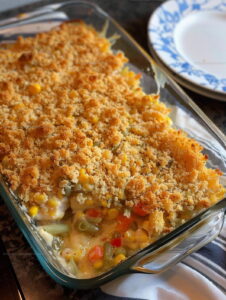
Crush up one sleeve of Ritz crackers until they’re in small, crispy pieces. Scatter them across the top of the casserole.
Butter the Cracker Layer
Melt 1/2 cup butter and drizzle it evenly over the cracker topping. This will help the crackers turn golden and crisp.
Bake to Perfection
Slide the casserole into the 350°F oven and bake for 40-45 minutes. You’re looking for a bubbly, lightly browned top that signals it’s ready to eat.
Rest and Serve
Let the casserole sit for 5 minutes after pulling it from the oven. This helps it set and makes serving easier. Dig in while it’s warm and enjoy!
Key Cooking Notes For Shoepeg Casserole
Flavorful Options for Shoepeg Casserole
Serving And Pairing Ideas For Shoepeg Casserole
Proper Storage For Shoepeg Casserole
Shoepeg Casserole Common Questions
What makes shoepeg corn different from regular corn?
Shoepeg corn has smaller, sweeter kernels with a white color that hold their shape better in casseroles, giving your dish a unique texture and flavor compared to standard yellow corn.
Can frozen vegetables work in this recipe?
Absolutely swap in frozen veggies, but thaw and drain them completely first to prevent excess moisture that could make your casserole soggy.
How do crackers create the perfect topping?
Crushing crackers adds a fantastic crunch that transforms your casserole from basic to delicious, creating a crispy golden layer that brings incredible texture to every bite.
Are there gluten-free alternatives for the cracker topping?
Substitute crushed gluten-free crackers or use cornflake crumbs to keep the same crunchy texture while making the dish safe for gluten-sensitive friends.
What proteins could complement this casserole?
Shredded rotisserie chicken or diced ham blend perfectly into the veggie mixture, turning this side dish into a complete meal that satisfies hunger.
Can this casserole be prepared ahead of time?
Assemble the entire dish up to 24 hours before baking, cover tightly, and refrigerate. Just add a few extra minutes to the baking time when ready to serve.
Shoepeg Casserole Recipe
- Total Time: 50-55 minutes
- Yield: 6 1x
Description
Shoepeg casserole brings comfort straight from Grandma’s kitchen to your dinner table. Creamy, cheesy, and packed with corn, this Southern classic will have everyone asking for seconds.
Ingredients
Main Ingredients:
- 1 11oz can shoepeg or white corn, drained
- 1 14oz can French cut green beans, drained
- 1 10.75oz can condensed cream of celery soup
- 8 oz sour cream
- ½ cup shredded cheddar cheese
Supporting Vegetables:
- 1 large stalk celery (diced)
- ½ yellow onion (diced)
- ½ red bell pepper (diced)
Topping:
- 1 sleeve Ritz crackers (crushed)
- ½ cup butter (melted)
- Salt and pepper to taste
Instructions
- Warm your oven to 350°F and coat an 8×8 baking dish with cooking spray to prevent sticking.
- Dice 1 large celery stalk, ½ yellow onion, and ½ red bell pepper into small, uniform pieces.
- Grab a large mixing bowl and combine diced vegetables, ½ cup shredded cheddar cheese, 1 can drained shoepeg corn, 1 can drained French cut green beans, 1 can condensed cream of celery soup, and 8 oz sour cream.
- Stir the mixture thoroughly until all ingredients are evenly distributed and well incorporated.
- Sprinkle salt and pepper across the surface to enhance the flavor profile.
- Transfer the vegetable mixture into the prepared baking dish, smoothing it into a consistent layer.
- Crush 1 sleeve of Ritz crackers into fine crumbs and distribute them evenly across the casserole’s surface.
- Melt ½ cup butter and gently drizzle it over the cracker topping, ensuring complete coverage.
- Slide the casserole into the preheated oven and bake for 40-45 minutes until the top turns golden brown and the edges become bubbly.
- Remove from the oven and allow the casserole to rest for 5 minutes before serving, which helps the dish set and makes cutting easier.
Notes
- Chop vegetables uniformly for consistent texture and even cooking throughout the casserole.
- Substitute cream of mushroom soup with cream of celery for a different flavor profile if preferred.
- Use gluten-free crackers to make this dish friendly for those with gluten sensitivities.
- For extra crunch, toast the cracker crumbs briefly in a skillet before sprinkling on top of the casserole.
- Prep Time: 10 minutes
- Cook Time: 40-45 minutes
- Category: Casseroles
- Method: Baking
- Cuisine: Southern American
Nutrition
- Serving Size: 6
- Calories: 275 kcal
- Sugar: 3 g
- Sodium: 470 mg
- Fat: 21 g
- Saturated Fat: 11 g
- Unsaturated Fat: 9 g
- Trans Fat: 0.5 g
- Carbohydrates: 17 g
- Fiber: 2 g
- Protein: 6 g
- Cholesterol: 40 mg
Daniel Navarro
Culinary Content Director
Expertise
Mexican-inspired Menus, Seasonal Restaurant Specials, Shared Plate Dining, Tequila Pairings, Chef-driven Recipes
Education
Daniel writes about bold flavors, chef-driven dishes, and the kind of restaurant moments that turn tacos, mezcal, and shared plates into a night worth repeating.