Oven Baked Chicken And Rice Recipe

Oven Baked Chicken and Rice Recipe Made Simple

Oven Baked Chicken and Rice recipe provides comfort food at its finest, combining protein and grains in one satisfying dish that feeds a crowd without fuss.

Busy weeknights call for meals that practically cook themselves, and few options match the convenience of a single pan doing all the work.

Leftovers taste just as good the next day, making it a smart choice for meal prep enthusiasts who appreciate dishes that hold up well.

Golden, tender results emerge from the oven every single time when you follow a reliable method.

Home cooks of all skill levels can master it and feel confident serving it to family or friends.

Top Reasons Oven Baked Chicken and Rice Works

  • One-Pan Wonder: This chicken and rice dish saves you from washing a mountain of pots and pans, making cleanup a breeze after dinner.
  • Family Comfort: Warm, hearty rice with tender chicken creates a satisfying meal that brings everyone together at the table without complicated cooking steps.
  • Hands-Off Cooking: Once everything goes in the oven, you can relax while the dish transforms into a delicious meal with minimal active preparation.
  • Pantry-Friendly: Using simple ingredients most kitchens already have means you can make this tasty dinner without a special grocery run.

All Ingredients Needed for Oven Baked Chicken and Rice

Protein:
  • 4 Chicken Thighs: The star of the dish that gives your meal a hearty, satisfying center. These thighs will become tender and flavorful as they bake right on top of your rice.
Main Carbohydrate:
  • 1 Cup Rice: The perfect base for your chicken that will soak up all the delicious broth and seasonings. This rice creates a complete and filling meal for your dinner.
Liquid Base:
  • 2 Cups Chicken Broth: The liquid that helps cook your rice and infuse incredible flavor throughout the entire dish. This broth ensures your rice stays moist and delicious.
Aromatics:
  • 1 Onion Chopped, 2 Cloves Garlic Minced: These ingredients will add depth and richness to your meal’s overall taste. They create a wonderful foundation of flavor that makes everything more delicious.
Seasonings:
  • 1 Teaspoon Paprika, 1 Teaspoon Salt, 1/2 Teaspoon Pepper: These spices bring warmth, brightness, and balanced seasoning to your chicken and rice. They transform simple ingredients into something special.
Fat:
  • 1 Tablespoon Olive Oil: The cooking fat that helps develop flavor and prevents sticking during the initial cooking process. This small amount adds richness to your dish.

What You’ll Need for Baked Chicken and Rice

  • Large Skillet: A spacious pan to sauté onions and rice, ensuring even cooking and perfect flavor development.
  • 9×13-inch Baking Dish: A sturdy ceramic or glass dish that gives your chicken and rice plenty of room to bake beautifully.
  • Measuring Cups: Accurate cups to measure rice and broth for consistent results every time.
  • Measuring Spoons: Small spoons to precisely add salt, pepper, and paprika without overdoing it.
  • Sharp Chef’s Knife: A reliable knife for chopping onions and preparing ingredients with clean, precise cuts.
  • Cutting Board: A solid surface to prep your ingredients safely and cleanly.
  • Aluminum Foil: Essential for covering the dish during initial baking to keep moisture locked in.
  • Wooden Spoon or Spatula: Perfect for stirring rice and mixing ingredients in the skillet.
  • Meat Thermometer (optional): Helps ensure your chicken reaches the perfect safe internal temperature.

Simple Steps For Chicken And Rice

1

Warm Up the Oven

Crank the oven to 375°F. This temperature will help create a perfectly cooked meal that’s crispy on the outside and tender inside.

2

Sizzle the Aromatics

Grab a large skillet and pour in 1 tablespoon of olive oil. Heat it up over medium flame. Drop in the chopped onion and minced garlic:

  • 1 onion, chopped
  • 2 cloves garlic, minced

Swirl them around until they soften and release their delicious fragrance.

3

Toast the Rice

Slide 1 cup of rice into the skillet and stir it around for about 2 minutes. This helps the rice develop a nice nutty flavor.

4

Build the Liquid Base

Pour in the liquid and seasonings to create a flavorful foundation:

  • 2 cups chicken broth
  • 1 teaspoon salt
  • 1/2 teaspoon pepper
  • 1 teaspoon paprika

Bring this mixture to a quick boil, letting all the flavors mingle.

5

Transfer to Baking Dish

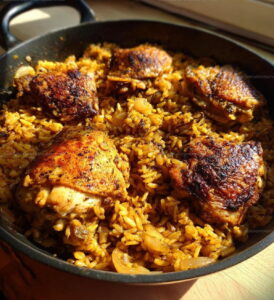
Carefully dump the rice mixture into a baking dish. Nestle the 4 chicken thighs right on top of the rice.

6

First Baking Phase

Cover the dish with foil and slide it into the 375°F oven. Let it bake for 35 minutes, allowing the chicken and rice to steam and become tender.

7

Crisp It Up

Remove the foil and return the dish to the oven. Bake for another 15 minutes so the chicken skin can turn golden and crisp.

8

Check and Serve

Ensure the chicken is fully cooked through. The dish is ready when the chicken reaches an internal temperature of 165°F. Serve hot and enjoy your comforting one-pan meal.

Helpful Tips For Oven Baked Chicken Rice

  • Sauté your onions and garlic until they turn soft and fragrant, releasing their delicious flavor into the pan.
  • Toast your rice for a couple minutes before adding liquid to enhance its nutty taste and prevent clumping.
  • Pour broth carefully to ensure your rice gets enough moisture without becoming soggy or dry.
  • Nestle chicken thighs gently on top of the rice mixture so they cook evenly and absorb all the delicious seasonings.
  • Cover the baking dish with foil during initial cooking to trap steam and keep everything moist, then uncover to let chicken skin crisp up beautifully.

Oven-Baked Chicken And Rice With Seasoning Options

  • Spicy Kick Version: Swap paprika for cayenne or chili powder to add heat, adjusting to 1/2 teaspoon for moderate spiciness and balancing with a dash of sour cream on top.
  • Veggie Boost Blend: Replace chicken thighs with firm tofu or chickpeas, using same seasoning and reducing baking time to 25 minutes for a plant-based protein alternative.
  • Mediterranean Style: Substitute chicken broth with white wine, add dried oregano and crumbled feta cheese before final bake, giving the dish a Greek-inspired flavor profile.
  • Gluten-Free Option: Use certified gluten-free rice and ensure chicken broth is gluten-free certified, keeping all other ingredients and cooking methods exactly the same for safe preparation.

How To Serve Oven Baked Chicken And Rice

  • Serve Warm and Fresh: Pull this dish straight from the oven and let it rest for 5 minutes so your chicken stays juicy and rice absorbs those delicious pan juices.
  • Perfect Side Companions: Roasted green beans or a crisp garden salad balance the hearty rice and chicken beautifully, adding color and fresh flavor to your plate.
  • Wine Pairing Selection: A light white wine like Pinot Grigio complements the mild seasonings and cuts through the richness of the chicken thighs.
  • Family-Style Presentation: Transfer the entire baking dish to the table for a comforting, rustic meal that encourages everyone to dig in together and share.

Oven Baked Chicken And Rice Storage Notes

  • Refrigerate any leftovers in an airtight container for up to 3 days, making sure the chicken and rice are completely cool before sealing to prevent soggy texture.
  • Freeze individual portions in sealed freezer bags, pressing out extra air, which will keep the dish fresh for about 2 months and make reheating super easy.
  • When reheating, add a splash of chicken broth to restore moisture and prevent the rice from drying out, warming in the oven or microwave until heated through.
  • Store raw chicken separately from other ingredients in the coldest part of your refrigerator, and always use within 1-2 days of purchasing for maximum freshness and safety.

Oven Baked Chicken and Rice Questions Answered

FAQ

Can I use chicken breasts instead of thighs?

Absolutely! Chicken breasts work perfectly in this recipe. Just ensure they’re boneless and adjust cooking time slightly to prevent drying out.

FAQ

What type of rice works best?

Long-grain white rice is ideal. Jasmine or basmati rice will give the best texture and absorb flavors beautifully.

FAQ

How do I know the chicken is fully cooked?

Use a meat thermometer. Chicken should reach an internal temperature of 165°F (74°C) at the thickest part.

FAQ

Can this dish be made gluten-free?

Yes! Simply use gluten-free chicken broth and check that your spices are certified gluten-free.

FAQ

Is it okay to add vegetables to the rice?

Definitely! Diced carrots, peas, or bell peppers blend wonderfully with the rice and chicken.

FAQ

Can I make this recipe ahead of time?

Prepare the dish up to the point of baking, cover, and refrigerate. When ready, bake as directed, adding a few extra minutes to the cooking time.

Print
clock clock iconcutlery cutlery iconflag flag iconfolder folder iconinstagram instagram iconpinterest pinterest iconfacebook facebook iconprint print iconsquares squares iconheart heart iconheart solid heart solid icon
Oven Baked Chicken And Rice Recipe

Oven Baked Chicken And Rice Recipe


5 Stars 4 Stars 3 Stars 2 Stars 1 Star

4.8 from 37 reviews

  • Total Time: 1 hour
  • Yield: 4 1x

Description

Oven Baked Chicken and Rice delivers comfort straight from your kitchen to the dinner table. Grab some simple ingredients and watch how this classic one-pan meal comes together with zero fuss and maximum flavor.


Ingredients

Scale

Main Proteins:

  • 4 chicken thighs

Supporting Grains and Liquid:

  • 1 cup rice
  • 2 cups chicken broth

Seasonings and Aromatics:

  • 1 onion, chopped
  • 2 cloves garlic, minced
  • 1 teaspoon paprika
  • 1 teaspoon salt
  • ½ teaspoon pepper
  • 1 tablespoon olive oil

Instructions

  1. Heat olive oil in a large skillet over medium heat. Sauté 1 chopped onion and 2 minced garlic cloves until they become soft and fragrant.
  2. Add 1 cup rice to the skillet. Stir and toast the rice for exactly 2 minutes to enhance its nutty flavor.
  3. Pour 2 cups chicken broth into the skillet. Sprinkle 1 teaspoon salt, ½ teaspoon pepper, and 1 teaspoon paprika. Bring the mixture to a rapid boil.
  4. Transfer the rice and broth mixture to a baking dish. Spread it evenly across the bottom of the dish.
  5. Arrange 4 chicken thighs directly on top of the rice mixture, positioning them skin-side up.
  6. Cover the baking dish tightly with aluminum foil. Slide the dish into a preheated 375°F oven.
  7. Bake the covered dish for precisely 35 minutes, allowing the rice to absorb the liquid and chicken to start cooking.
  8. Remove the foil to expose the chicken. Return the dish to the 375°F oven for an additional 15 minutes.
  9. Check that chicken reaches an internal temperature of 165°F. The rice should be tender and chicken skin golden and crisp.

Notes

  • Use boneless, skinless chicken thighs for the most tender and flavorful result.
  • Check rice doneness by tasting a few grains before serving, adding extra broth if needed for softer texture.
  • For a crispy chicken top, brush thighs with melted butter or olive oil before the final uncovered baking phase.
  • Customize the dish by substituting rice with quinoa or cauliflower rice for lower-carb options, adjusting liquid amounts accordingly.
  • Prep Time: 10 minutes
  • Cook Time: 50 minutes
  • Category: Baked
  • Method: Baking
  • Cuisine: American

Nutrition

  • Serving Size: 4
  • Calories: 395 kcal
  • Sugar: 1 g
  • Sodium: 720 mg
  • Fat: 15 g
  • Saturated Fat: 3.5 g
  • Unsaturated Fat: 10 g
  • Trans Fat: 0 g
  • Carbohydrates: 35 g
  • Fiber: 2 g
  • Protein: 30 g
  • Cholesterol: 110 mg
Daniel Navarro

Daniel Navarro

Culinary Content Director

Expertise

Mexican-inspired Menus, Seasonal Restaurant Specials, Shared Plate Dining, Tequila Pairings, Chef-driven Recipes

Education

City Colleges of Chicago
  • Program: Culinary Arts, Associate in Applied Science
  • Focus: Trained in hands-on food production in a commercial food-service setting, with coursework that covers culinary technique, ethnic and classical menus, business planning, cost control, and merchandising.

Daniel writes about bold flavors, chef-driven dishes, and the kind of restaurant moments that turn tacos, mezcal, and shared plates into a night worth repeating.

Leave a Reply

Your email address will not be published. Required fields are marked *

Recipe rating 5 Stars 4 Stars 3 Stars 2 Stars 1 Star