Crispy Oven Baked Cheesy Tacos Recipe for Taco Night
Craving oven baked cheesy tacos that redefine comfort food? Comfort classics just got an upgrade with this mouthwatering twist on traditional taco night.
Mexican-inspired cuisine reaches new heights of deliciousness through simple yet strategic baking techniques.
Melted cheese creates a crispy, golden exterior that promises pure satisfaction for everyone around the table.
Weeknight dinners suddenly become extraordinary with minimal effort and maximum flavor impact.
Friends and family will enthusiastically gather, eager to experience these crowd-pleasing delights that transform an everyday meal into something spectacular.
Why Oven Baked Cheesy Tacos Are Always A Hit
Ingredient List For Oven Baked Cheesy Tacos
Main Protein:Aromatics:Seasoning:Taco Shell Base:Cheese Layer:Fresh Toppings:Optional Garnishes:Handy Kitchen Tools for Oven Baked Cheesy Tacos
Steps for Making Oven Baked Cheesy Tacos
Prep the Oven
Heat the oven to exactly 400°F. Grab a baking dish and stand your hard taco shells upright so they look like little soldiers ready for their cheesy mission.
Brown the Meat
Grab a skillet and place it over medium heat. Toss in your ground beef and finely chopped onion. Break up the meat as it cooks, making sure every bit gets golden and delicious. Once it’s looking good, drain away any extra fat.
Flavor Explosion
Time to wake up those flavors! Drop in your minced garlic and taco seasoning. Stir everything around for about 1 minute to let the spices dance. Next, add your tomato sauce or salsa:
Let this simmer for 5 minutes so the flavors can get to know each other.
Stuff Those Shells
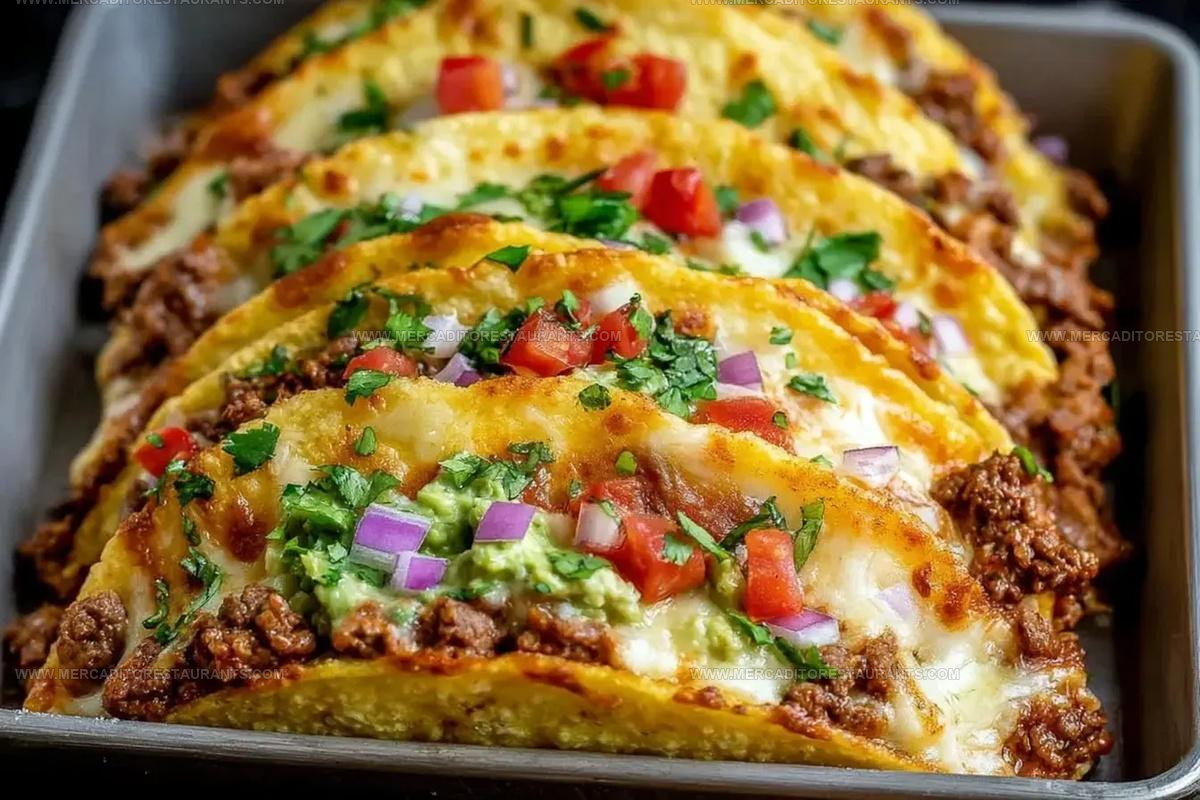
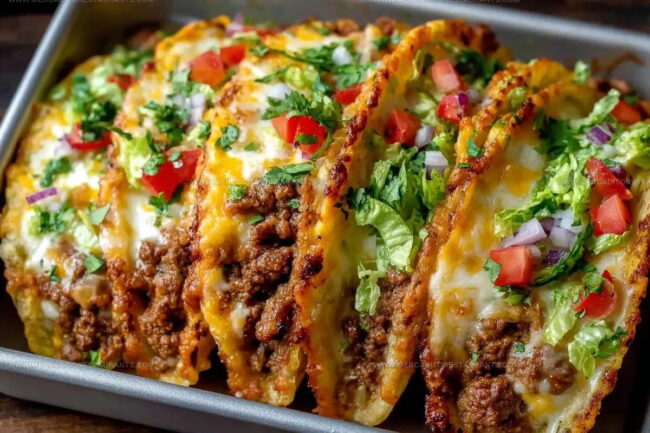
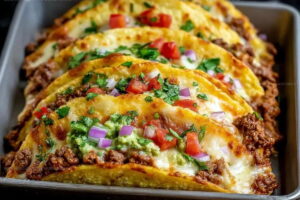
Carefully spoon your beef mixture into each taco shell. Don’t be shy – fill them generously! Now shower them with cheese:
Make sure every shell gets a nice cheesy blanket.
Bake to Perfection
Slide the baking dish into the 400°F oven. Bake for 12-15 minutes until the cheese melts completely and the shells turn a beautiful golden brown.
Dress Up Your Tacos
Time for the fun part! Top your cheesy tacos with fresh goodies:
Final Touches
Serve these beauties right away while they’re hot and crispy. Add a dollop of sour cream, a spoonful of guacamole, or some jalapeño slices if you’re feeling adventurous.
Extra Insight For Oven Baked Cheesy Tacos
What Fresh Takes Enhance Oven Baked Cheesy Tacos
How To Serve Oven Baked Cheesy Tacos
Simple Storage Guide For Oven Baked Cheesy Tacos
Oven Baked Cheesy Tacos Questions Answered
Can I use ground turkey instead of beef?
Absolutely! Ground turkey works perfectly and creates a leaner version of these cheesy tacos. Just make sure to season it well and cook thoroughly.
What if I cannot find hard taco shells?
Soft tortillas can be folded and placed in a baking dish. They will crisp up nicely in the oven and create a slightly different texture for your tacos.
How do I prevent the taco shells from getting soggy?
Drain your beef mixture completely and avoid adding extra liquid. Pat the meat dry before filling the shells to keep them crisp and crunchy.
Can kids help make these tacos?
Kids can help by filling the shells with meat and sprinkling cheese. Always supervise them around the hot stove and oven.
Do these tacos reheat well?
Reheat in the oven at 350°F for 5-7 minutes to maintain the shell’s crispness. Microwave heating might make the shells soft.
Are these tacos spicy?
The taco seasoning can be mild or spicy. Choose a seasoning blend that matches your heat preference, or adjust the amount to control spiciness.
Oven Baked Cheesy Tacos Recipe
- Total Time: 35 minutes
- Yield: 4 1x
Description
Cheesy tacos become pure comfort when baked until golden and crispy in your oven. Melted cheese, warm tortillas, and simple ingredients make this dish a total weeknight winner for your family.
Ingredients
Main Ingredients:
- 1 lb ground beef
- 10–12 hard taco shells
- 1.5 cups shredded cheese
Supporting Ingredients:
- 1 small onion
- 2 garlic cloves
- 1 packet taco seasoning
- 0.5 cup tomato sauce
Garnish and Optional Toppings:
- Salt
- Pepper
- 1 cup shredded lettuce
- 1 cup diced tomatoes
- 0.5 cup diced red onion
- Chopped cilantro
- Sour cream
- Guacamole
- Jalapeno slices
- Hot sauce
Instructions
- Fire up your oven to precisely 400°F (200°C) and position hard taco shells standing upright in a baking dish.
- Sizzle 1 lb ground beef and 1 small diced onion in a skillet over medium heat until thoroughly browned. Carefully drain any excess fat.
- Introduce 2 minced garlic cloves and 1 packet of taco seasoning, stirring for exactly 60 seconds. Pour in ½ cup tomato sauce and allow mixture to simmer for 5 minutes.
- Distribute 1 lb beef mixture evenly into 10-12 hard taco shells, ensuring each shell receives a generous portion.
- Sprinkle 1 ½ cups shredded cheese across the filled shells, covering the meat completely.
- Transfer baking dish to the 400°F oven and bake for 12-15 minutes until cheese transforms into a bubbly, golden blanket and shell edges turn crisp.
- Scatter 1 cup shredded lettuce, 1 cup diced tomatoes, and ½ cup red onion over the hot tacos.
- Optionally crown your creation with fresh cilantro, dollops of sour cream, guacamole, jalapeño slices, or your favorite hot sauce.
- Serve immediately while cheese remains molten and shells maintain their satisfying crunch.
Notes
- Let the beef mixture cool slightly before filling shells to prevent soggy bottoms and keep taco shells crisp.
- Use pre-shredded cheese blends for easier melting and more consistent coverage across tacos.
- For a leaner version, substitute ground turkey or plant-based meat crumbles instead of beef.
- Line your baking dish with parchment paper for super easy cleanup and preventing stuck-on cheese.
- Prep Time: 15 minutes
- Cook Time: 20 minutes
- Category: Baked
- Method: Baking
- Cuisine: Mexican
Nutrition
- Serving Size: 4
- Calories: 475 kcal
- Sugar: 4 g
- Sodium: 780 mg
- Fat: 32 g
- Saturated Fat: 14 g
- Unsaturated Fat: 16 g
- Trans Fat: 1 g
- Carbohydrates: 21 g
- Fiber: 4 g
- Protein: 30 g
- Cholesterol: 95 mg
Daniel Navarro
Culinary Content Director
Expertise
Mexican-inspired Menus, Seasonal Restaurant Specials, Shared Plate Dining, Tequila Pairings, Chef-driven Recipes
Education
Daniel writes about bold flavors, chef-driven dishes, and the kind of restaurant moments that turn tacos, mezcal, and shared plates into a night worth repeating.