Easy Salmon Sushi Bake Recipe

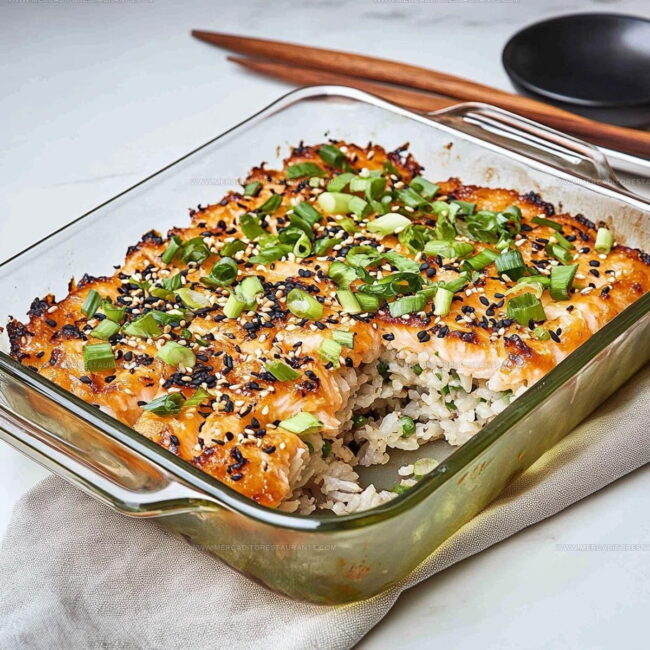
Salmon Sushi Bake Recipe with Creamy Spicy Layers

Easy Salmon Sushi Bake Recipe brings together everything people love about sushi in a format that feels relaxed and approachable for any occasion.

This dish has become a weeknight favorite because it delivers bold flavors without the fuss of rolling individual pieces.

You can serve it at casual dinners or potlucks where everyone seems to ask for seconds.

The concept works beautifully when you want something special but don't have hours to spend in the kitchen.

It's comforting yet exciting, familiar yet different enough to feel like an adventure on a plate.

Friends always appreciate how fun and interactive the whole experience becomes when they assemble their own perfect bite.

The flavors come together in a way that satisfies both sushi lovers and newcomers.

Time to make this crowd-pleaser happen in the comfort of home.

Special Features of Salmon Sushi Bake

  • Family Feast Fun: This salmon sushi bake turns dinner into an interactive, hands-on experience where everyone gathers around and builds their own bite-sized seaweed rolls together. Perfect for bringing the whole crew closer at mealtime.
  • Simple Cooking Adventure: No advanced culinary skills needed – just mix, layer, and bake. Anyone from teenagers to kitchen newbies can create this delicious dish without stress or complicated techniques.
  • Flavor Explosion in Every Bite: The combination of creamy salmon, tangy sriracha, rich cream cheese, and savory furikake creates a seriously satisfying taste that keeps everyone coming back for more.
  • Super Flexible Meal: Totally customizable with optional toppings and easy to adjust for different preferences. Vegetarians can swap salmon for tofu, and spice lovers can add extra sriracha to kick things up.

Ingredients That Form A Cozy Sushi-Inspired Layer

Rice Base:
  • 2 Cups Cooked Sushi Rice: Perfectly seasoned foundation that creates a delicious base for your salmon mixture. Choose short-grain rice for authentic texture.
  • 2 Tablespoons Rice Vinegar, 1 Tablespoon Sugar, ½ Teaspoon Salt: Transformative seasoning that brightens and balances your rice’s flavor profile.
Salmon Mixture:
  • 12 Oz Cooked Salmon: Tender protein that serves as the star of your dish. Select freshly baked or high-quality canned salmon for best results.
  • ½ Cup Mayonnaise: Creamy binding ingredient that helps hold your salmon mixture together. Kewpie mayo offers an extra authentic Japanese touch.
  • 1 Tablespoon Sriracha: Spicy element that provides a gentle kick to your salmon blend. Adjust quantity based on your heat preference.
  • 2 Teaspoons Soy Sauce or Tamari: Salty seasoning that enhances the salmon’s natural flavor.
  • 1 Tablespoon Cream Cheese: Optional ingredient that adds richness and smooth texture to your mixture.
Finishing Touches:
  • 2 Green Onions, Chopped: Fresh garnish that introduces a subtle onion brightness.
  • 1 Teaspoon Sesame Oil: Nutty accent that deepens overall flavor complexity.
  • 1 Tablespoon Furikake Seasoning: Umami-rich topping that provides traditional Japanese seasoning.
  • Roasted Seaweed Sheets: Essential wrapper for serving your sushi bake.
  • Optional Toppings (Sliced Avocado, Sesame Seeds, Pickled Ginger, Cucumbers): Customizable garnishes that let you personalize your dish.

Pieces Useful For Mixing, Spreading, And Broiling

  • Rice Cooker or Pot: My go-to tool for perfectly cooked sushi rice, ensuring fluffy and consistent results every time.
  • Mixing Bowl: Essential for blending the salmon with other ingredients smoothly and easily.
  • Baking Dish: Perfect for creating the base layer of rice and spreading the salmon mixture evenly.
  • Measuring Spoons: Helpful for accurately measuring out vinegar, sugar, and seasonings.
  • Mixing Spoon or Spatula: Great for stirring the rice seasoning and salmon mixture without making a mess.
  • Oven: Needed to bake the dish and create that delicious golden-brown top.
  • Cutting Board: Useful for chopping green onions and preparing any additional toppings.
  • Fork: Perfect for flaking the cooked salmon into small, even pieces.

Step-by-Step Guide to Salmon Sushi Bake

Step-by-Step Guide to Salmon Sushi Bake
1

Prepare Sushi Rice

Cook 2 cups of rice according to package directions. While the rice is warm, mix in 2 tablespoons rice vinegar, 1 tablespoon sugar, and ½ teaspoon salt. Spread the seasoned rice evenly in your baking dish, pressing it down gently to create a solid base that will hold all the delicious toppings.

2

Blend Salmon Mixture

Break down 12 oz of cooked salmon into small pieces. In a mixing bowl, combine the salmon with:

  • ½ cup mayonnaise
  • 1 tablespoon sriracha
  • 2 teaspoons soy sauce
  • 1 tablespoon softened cream cheese
  • 2 chopped green onions
  • 1 teaspoon sesame oil

Stir everything until the mixture becomes smooth and creamy.

3

Layer and Season

Spread the salmon mixture evenly over the rice base. Sprinkle 1 tablespoon furikake seasoning across the top, making sure your dish gets an even coating of flavor.

4

Bake to Perfection

Heat your oven to 375°F (190°C). Slide the dish into the oven and bake for 10-15 minutes until everything is heated through and the top looks slightly golden. For extra crispness, switch to broil for 2-3 minutes, watching carefully to prevent burning.

5

Serve and Enjoy

Let the dish rest for a few minutes after removing from the oven. Grab some roasted seaweed sheets and serve hot. Scoop portions onto the seaweed, roll it up, and savor each bite of this tasty creation.

Small Upgrades That Add More Umami

  • Cook rice in a rice cooker for consistent, fluffy results every single time. Seasoning the rice while it’s warm helps the flavors absorb perfectly.
  • Fresh salmon works best. Consider poaching or baking the fish beforehand to ensure it’s tender and easy to flake. Cool slightly before mixing with other ingredients.
  • Adjust sriracha levels to match your spice preference. A dash more or less can transform the entire dish’s heat profile.
  • Watch carefully during the final broiling stage. Those extra two minutes can mean the difference between golden perfection and burnt topping. Rotate the dish midway for even browning.
  • Prep extra seaweed sheets and have them ready. Warm sushi bakes are best enjoyed immediately, so have everyone gathered and ready to assemble their own rolls at the table.

Different Takes On Salmon Sushi Bake

  • Vegetarian Sushi Bake: Swap salmon for roasted and crumbled tofu or seasoned jackfruit. Mix with vegan mayo, add extra sesame oil for depth, and use nutritional yeast for a cheesy flavor. Perfect for plant-based friends who crave sushi textures.
  • Spicy Korean Fusion Bake: Replace salmon with shredded Korean-style pulled chicken or bulgogi beef. Swap sriracha for gochujang sauce, add kimchi bits into the mix, and sprinkle with toasted sesame seeds. Brings a serious kick to the classic recipe.
  • Low-Carb Cauliflower Base Alternative: Substitute sushi rice with riced cauliflower. Press cauliflower into the baking dish, season similarly, and proceed with salmon topping. Great for anyone watching carbohydrate intake while still enjoying sushi flavors.
  • Gluten-Free Seafood Version: Use tamari instead of regular soy sauce, confirm furikake is gluten-free, and consider adding crab or imitation crab meat alongside salmon. Ensures those with gluten sensitivities can still enjoy this crowd-pleasing dish.

Meals That Welcome A Pan Of Sushi Bake

  • Serving Style: Gather friends and family around the table for a fun, interactive meal where everyone can create their own sushi rolls.
  • Portion Control: Aim for about 1/2 cup servings, which lets everyone customize their plate without overwhelming portions.
  • Seaweed Wrap Technique: Keep nori sheets crisp by adding them right at serving time, preventing soggy texture during baking.
  • Flavor Boost: Sprinkle extra green onions, toasted sesame seeds, or a drizzle of spicy mayo on top for fresh, personalized touches.

Keeping Leftovers Fresh And Flavorful

  • Refrigerate sushi bake in an airtight container for up to 3 days. Keeping it tightly sealed maintains the rice’s moisture and the salmon’s flavor.
  • Warm individual servings for 60 – 90 seconds, covering with a damp towel to keep everything soft and prevent drying.
  • For better texture, warm at 350°F for 5 – 7 minutes in a shallow dish covered with foil.
  • If planning ahead, store rice and salmon separately to prevent the rice from becoming soggy. Combine right before reheating for the freshest taste.

Questions About Making Salmon Sushi Bake

FAQ

What type of salmon works best for this recipe?

Fresh or canned salmon both work great. Personally, fresh salmon provides the best flavor and texture, but canned salmon is a convenient alternative when fresh isn’t available.

FAQ

Can vegetarians enjoy this dish?

Absolutely! Replace salmon with cooked tofu, crab-style imitation meat, or roasted vegetables like mushrooms and bell peppers for a delicious plant-based version.

FAQ

How spicy is the sriracha in the recipe?

The amount used creates a mild kick. Adjust the sriracha to your preference – add more for extra heat or reduce for a milder flavor.

FAQ

Is furikake necessary for the recipe?

Furikake adds incredible depth and traditional Japanese flavor, but can be substituted with sesame seeds, nori flakes, or everything bagel seasoning if needed.

FAQ

What makes this different from traditional sushi?

Unlike rolled sushi, this baked version is easier to prepare and perfect for sharing. It combines all the classic sushi flavors in a comforting, family-style dish.

Print
clock clock iconcutlery cutlery iconflag flag iconfolder folder iconinstagram instagram iconpinterest pinterest iconfacebook facebook iconprint print iconsquares squares iconheart heart iconheart solid heart solid icon
Easy Salmon Sushi Bake Recipe

Easy Salmon Sushi Bake Recipe


5 Stars 4 Stars 3 Stars 2 Stars 1 Star

4.8 from 34 reviews

  • Total Time: 33 minutes
  • Yield: 4 1x

Description

Salmon Sushi Bake brings Japanese-inspired comfort straight to your dinner table with zero fuss. Creamy, crispy, and packed with familiar flavors, this crowd-pleasing dish turns simple ingredients into a memorable family feast that everyone will devour.


Ingredients

Scale

Protein:

  • 12 oz salmon (cooked)

Base Ingredients:

  • 2 cups sushi rice (cooked)
  • ½ cup mayonnaise

Seasonings and Accompaniments:

  • 2 tablespoons rice vinegar
  • 1 tablespoon sugar
  • 1 tablespoon sriracha
  • 1 tablespoon furikake seasoning
  • 1 tablespoon cream cheese
  • 2 teaspoons soy sauce
  • 1 teaspoon sesame oil
  • ½ teaspoon salt
  • 2 green onions
  • Roasted seaweed sheets
  • Optional toppings: sliced avocado, sesame seeds, pickled ginger, cucumbers

Instructions

  1. Combine 2 cups sushi rice with 2 tablespoons rice vinegar, 1 tablespoon sugar, and ½ teaspoon salt. Stir thoroughly while rice remains warm to ensure even seasoning. Press mixture firmly into a baking dish to create a compact base layer.
  2. Shred 12 oz salmon into small, uniform pieces using a fork. Mix salmon with ½ cup mayonnaise, 1 tablespoon sriracha, 2 teaspoons soy sauce, 1 tablespoon cream cheese, and your chopped green onions until ingredients blend smoothly.
  3. Distribute salmon mixture across rice layer, spreading evenly to cover entire surface. Sprinkle 1 tablespoon furikake seasoning over top, ensuring consistent coverage for maximum flavor in each bite.
  4. Preheat oven to 375°F (190°C). Place prepared dish into preheated oven for exactly 10-15 minutes. Watch carefully to prevent burning while achieving golden-brown edges.
  5. Remove dish from oven and allow 3-4 minutes cooling time. This helps ingredients set and makes serving easier.
  6. Cut roasted seaweed sheets into convenient squares. Scoop salmon-rice mixture directly onto seaweed, creating personal hand rolls at the table. Garnish with optional toppings like sliced avocado or sesame seeds.

Notes

  • Check your rice vinegar’s acidity level, as some brands are stronger than others, which can affect the rice’s flavor balance.
  • Salmon can be substituted with cooked crab, imitation crab, or even shredded chicken for different protein options.
  • When spreading the rice, use slightly damp hands to prevent sticking and create an even, compact base layer.
  • For a lighter version, replace some mayonnaise with Greek yogurt and use low-fat cream cheese to reduce overall calories.
  • Prep Time: 15 minutes
  • Cook Time: 18 minutes
  • Category: Baked
  • Method: Baking
  • Cuisine: Japanese-American

Nutrition

  • Serving Size: 4
  • Calories: 396 kcal
  • Sugar: 6 g
  • Sodium: 550 mg
  • Fat: 25 g
  • Saturated Fat: 5 g
  • Unsaturated Fat: 18 g
  • Trans Fat: 0 g
  • Carbohydrates: 28 g
  • Fiber: 1 g
  • Protein: 23 g
  • Cholesterol: 50 mg
Daniel Navarro

Daniel Navarro

Culinary Content Director

Expertise

Mexican-inspired Menus, Seasonal Restaurant Specials, Shared Plate Dining, Tequila Pairings, Chef-driven Recipes

Education

City Colleges of Chicago
  • Program: Culinary Arts, Associate in Applied Science
  • Focus: Trained in hands-on food production in a commercial food-service setting, with coursework that covers culinary technique, ethnic and classical menus, business planning, cost control, and merchandising.

Daniel writes about bold flavors, chef-driven dishes, and the kind of restaurant moments that turn tacos, mezcal, and shared plates into a night worth repeating.

Leave a Reply

Your email address will not be published. Required fields are marked *

Recipe rating 5 Stars 4 Stars 3 Stars 2 Stars 1 Star