Crispy Roasted Cauliflower Recipe

Herb-Crusted Roasted Cauliflower Recipe for Weeknight Dinners

Roasted cauliflower recipe collections showcase one of the most versatile vegetables that has earned a permanent spot on dinner tables everywhere.

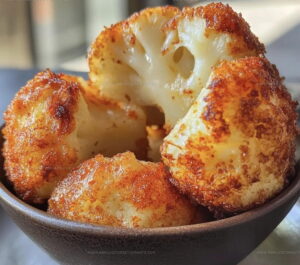
When exposed to high heat, something magical happens as ordinary florets turn golden and develop a depth of flavor that wins over even the pickiest eaters.

The transformation from bland to beautifully caramelized makes it an ideal side dish for weeknight meals or special occasions.

Simple preparation means less time fussing in the kitchen and more time enjoying the results.

Whether you need something quick for busy evenings or want an impressive addition to holiday spreads, this vegetable serves up every time.

The naturally mild taste provides a perfect canvas that pairs well with countless flavor profiles and cuisines.

Best of all, the hands-off cooking method means you can focus on other dishes while the oven does most of the work for you.

Practical Reasons to Try Roasted Cauliflower

  • Simple Side Dish: This roasted cauliflower transforms a plain vegetable into a flavor-packed companion that makes your dinner plate look incredible without complicated steps.
  • Quick Healthy Option: Packed with nutrients and super easy to prepare, this recipe gives you a nutritious vegetable side that comes together faster than ordering takeout.
  • Crowd-Pleasing Veggie: Even people who typically avoid cauliflower find these crispy, seasoned florets surprisingly delicious and will ask for seconds at the table.
  • Adaptable Flavor Base: With just a few basic spices, your cauliflower becomes a versatile dish that can match practically any main course from chicken to fish.

Ingredients Used in Roasted Cauliflower

Main Vegetable:
  • Cauliflower (1 Large Head): The star of this roasted dish that transforms into a crispy, golden treat for your dinner table. Each floret will become a delectable bite packed with flavor.
Seasoning Enhancers:
  • Olive Oil (3 Tablespoons): Creates a perfect golden coating that helps your cauliflower crisp up beautifully in the oven. This liquid gold ensures every piece gets wonderfully caramelized.
  • Garlic Powder (1 Teaspoon): Adds a savory depth that makes your cauliflower more exciting and aromatic. Brings a subtle punch of flavor to each roasted morsel.
  • Paprika (1 Teaspoon): Introduces a warm, slightly smoky undertone that elevates the entire dish. Provides a beautiful reddish hint of color and complexity.
Flavor Balancers:
  • Salt (1 Teaspoon): Helps draw out the natural sweetness of your cauliflower and heightens all other seasonings. Adjust according to your personal taste preference.
  • Pepper (1/2 Teaspoon): Delivers a gentle background heat that complements the other spices. Rounds out the flavor profile with a mild kick.

What Tools Roast Cauliflower

  • Large Baking Sheet: The key surface for spreading your cauliflower florets evenly and achieving that perfect golden-brown roast.
  • Parchment Paper: Helps prevent sticking and makes clean-up a breeze when roasting your vegetables.
  • Large Mixing Bowl: Essential for tossing your cauliflower with seasonings and ensuring every floret gets perfectly coated.
  • Sharp Chef’s Knife: Needed to cut your cauliflower into uniform, bite-sized florets that will roast consistently.
  • Kitchen Towel: Perfect for drying your cauliflower after rinsing to help the seasonings stick and promote better browning.
  • Measuring Spoons: Helps you add just the right amount of spices and salt to create balanced flavor.
  • Wooden Spoon or Silicone Spatula: Great for gently tossing and turning your cauliflower during roasting to ensure even cooking.

Simple Roasting Method for Cauliflower

1

Prepare Oven

Heat the oven to 425°F (220°C) and grab a baking sheet lined with parchment paper.

2

Clean Cauliflower

Rinse the large cauliflower head under cold water, then thoroughly dry it with a clean kitchen towel.

3

Break Down Cauliflower

Chop the cauliflower into uniform florets, making sure they’re roughly the same size so they’ll cook evenly.

4

Season Cauliflower

Grab a large mixing bowl and toss the florets with seasonings:

  • 3 tablespoons olive oil
  • 1 teaspoon garlic powder
  • 1 teaspoon paprika
  • 1 teaspoon salt
  • 1/2 teaspoon pepper

Ensure every floret gets a nice, even coating of the seasoning mix.

5

Arrange on Baking Sheet

Spread the seasoned cauliflower across the parchment-lined baking sheet in a single layer. Don’t crowd the florets – they need breathing room to get crispy.

6

Roast to Perfection

Place the baking sheet in the preheated oven and roast for 25-30 minutes. Halfway through cooking, give the cauliflower a quick toss to ensure each piece gets golden and crisp.

7

Serve and Enjoy

Pull the cauliflower from the oven when it’s beautifully golden brown and tender. Let it rest for a few minutes before serving to let the flavors settle.

Best Browning Tips for Roasted Cauliflower

  • Ensure your cauliflower is completely dry after rinsing to help it crisp up beautifully and prevent steaming.
  • Spread florets in a single layer without overcrowding, so each piece roasts perfectly and gets deliciously golden edges.
  • Massage your spices and oil into the florets, making sure every nook and cranny gets coated for maximum flavor.
  • Rotating the baking sheet midway through roasting helps your cauliflower cook evenly and develop a consistent golden-brown color.
  • Look for caramelized, deep golden-brown edges and a tender texture when testing if your roasted cauliflower is ready.

Easy Roasted Cauliflower Variations to Try

  • Spicy Kick Variation: Swap paprika for cayenne pepper and add red pepper flakes to give your cauliflower a seriously hot flavor profile, adjusting spice levels to match your heat tolerance.
  • Cheesy Herb Blend: Sprinkle grated parmesan and fresh chopped herbs like thyme or rosemary over the cauliflower during the last 10 minutes of roasting for a rich, savory upgrade.
  • Mediterranean Style: Replace olive oil with za’atar seasoning and drizzle with tahini sauce after roasting, creating a Middle Eastern-inspired vegetable side that transforms your basic recipe.
  • Vegan Nutritional Boost: Swap olive oil for avocado oil and add nutritional yeast for a dairy-free cheesy flavor that increases protein content while keeping the recipe completely plant-based.

Simple Serving Styles for Roasted Cauliflower

  • Serving Size: Aim for about one cup of roasted cauliflower per person as a delicious side dish that pairs wonderfully with main courses.
  • Perfect Protein Partner: Serve alongside grilled chicken or baked fish for a balanced, nutritious meal that makes your plate look and taste amazing.
  • Flavor Boost: Sprinkle some fresh chopped parsley or grated Parmesan cheese right after roasting to add an extra layer of deliciousness that makes the cauliflower pop.
  • Smart Leftovers Tip: Chop the cold roasted cauliflower into a salad the next day for a quick lunch that transforms your dinner remnants into something fresh and exciting.

How to Store Roasted Cauliflower

  • Store leftover roasted cauliflower in an airtight container in your refrigerator for up to 4 days. The texture stays best when you reheat gently in the oven to maintain its crispy edges.
  • Freeze your roasted cauliflower florets in a single layer on a baking sheet first, then transfer to a freezer bag. This prevents them from sticking together and helps preserve their delicious roasted texture.
  • When reheating from frozen, spread the cauliflower on a baking sheet and warm at 375F to help restore the original crispy exterior without making them soggy.
  • Keep raw prepped cauliflower florets in a sealed container with a paper towel to absorb moisture, which helps them stay fresh in your refrigerator for about 3-4 days before roasting.

Roasted Cauliflower Q&A

FAQ

Can I use frozen cauliflower instead of fresh?

Frozen cauliflower works, but fresh delivers the best texture and flavor. Thaw and pat frozen florets completely dry before roasting to prevent soggy results.

FAQ

How do I prevent my cauliflower from becoming mushy?

Spread florets in a single layer without overcrowding. This ensures crispy edges and prevents steaming. Leave space between pieces for proper roasting.

FAQ

What if my cauliflower doesn’t brown evenly?

Flip the florets halfway through cooking and use a high oven temperature. Uneven browning can happen if your baking sheet isn’t hot enough or florets are different sizes.

FAQ

Can I make this dish ahead of time?

Roast cauliflower just before serving for maximum crispness. Reheating can make the florets soft and less appealing.

FAQ

Are there alternatives to olive oil?

Avocado or grapeseed oil work great. They have high smoke points and help create that perfect golden-brown exterior.

FAQ

How do I know when the cauliflower is perfectly roasted?

Look for golden brown edges and a tender center. Test with a fork – it should pierce easily but not fall apart.

Print
clock clock iconcutlery cutlery iconflag flag iconfolder folder iconinstagram instagram iconpinterest pinterest iconfacebook facebook iconprint print iconsquares squares iconheart heart iconheart solid heart solid icon
Crispy Roasted Cauliflower Recipe

Crispy Roasted Cauliflower Recipe


5 Stars 4 Stars 3 Stars 2 Stars 1 Star

4.6 from 19 reviews

  • Total Time: 35-40 minutes
  • Yield: 4 1x

Description

Roasted Cauliflower delivers a simple, crispy side dish that brings maximum flavor with minimal effort. Your dinner table gets an instant upgrade with this golden, seasoned veggie that everyone will devour.


Ingredients

Scale

Main Ingredients:

  • 1 large head cauliflower

Seasonings:

  • 1 teaspoon garlic powder
  • 1 teaspoon paprika
  • 1 teaspoon salt
  • ½ teaspoon pepper

Cooking Liquid:

  • 3 tablespoons olive oil

Instructions

  1. Preheat the oven to 425°F and position the rack in the center to ensure even roasting.
  2. Thoroughly rinse the whole cauliflower head under cold running water, then completely dry using a clean kitchen towel.
  3. Carefully slice the cauliflower into uniform 1-inch florets to guarantee consistent cooking and crispy edges.
  4. Place the florets into a spacious mixing bowl and drizzle 3 tablespoons of olive oil over them.
  5. Sprinkle 1 teaspoon each of garlic powder and paprika, then add 1 teaspoon salt and ½ teaspoon pepper directly onto the cauliflower.
  6. Gently toss the florets until every piece is evenly and generously coated with the seasoning mixture.
  7. Line a rimmed baking sheet with parchment paper to prevent sticking and promote easy cleanup.
  8. Arrange the seasoned florets in a single layer, ensuring they are not overcrowded to achieve maximum crispiness.
  9. Slide the baking sheet into the preheated 425°F oven and roast for 25-30 minutes, rotating the pan halfway through.
  10. Check for golden-brown edges and tender texture, which indicates perfectly roasted cauliflower.
  11. Remove from the oven and let the florets rest for 3-4 minutes before serving to allow slight cooling and flavor settling.

Notes

  • Fresh cauliflower with tight, compact florets roasts best and ensures crispy edges.
  • Patting the florets completely dry helps them brown and caramelize instead of steaming.
  • Space out the florets on the baking sheet so they roast evenly without crowding and getting soggy.
  • For a dairy-free version, replace butter with olive oil and add nutritional yeast for extra flavor.
  • Prep Time: 10 minutes
  • Cook Time: 25-30 minutes
  • Category: Roasted
  • Method: Roasting
  • Cuisine: American

Nutrition

  • Serving Size: 4
  • Calories: 86 kcal
  • Sugar: 3 g
  • Sodium: 570 mg
  • Fat: 7 g
  • Saturated Fat: 1 g
  • Unsaturated Fat: 6 g
  • Trans Fat: 0 g
  • Carbohydrates: 7 g
  • Fiber: 3 g
  • Protein: 2 g
  • Cholesterol: 0 mg
Daniel Navarro

Daniel Navarro

Culinary Content Director

Expertise

Mexican-inspired Menus, Seasonal Restaurant Specials, Shared Plate Dining, Tequila Pairings, Chef-driven Recipes

Education

City Colleges of Chicago
  • Program: Culinary Arts, Associate in Applied Science
  • Focus: Trained in hands-on food production in a commercial food-service setting, with coursework that covers culinary technique, ethnic and classical menus, business planning, cost control, and merchandising.

Daniel writes about bold flavors, chef-driven dishes, and the kind of restaurant moments that turn tacos, mezcal, and shared plates into a night worth repeating.

Leave a Reply

Your email address will not be published. Required fields are marked *

Recipe rating 5 Stars 4 Stars 3 Stars 2 Stars 1 Star