
Crispy Baked Chicken Chimichangas Recipe for Dinner
Baked chicken chimichangas bring all the satisfaction of a restaurant favorite right to your home kitchen without any of the guilt.
Crispy on the outside and packed with flavor on the inside, they deliver that perfect contrast of textures everyone craves at dinnertime.
Whether feeding a hungry crowd on game day or planning a weeknight meal that feels special, this dish checks every box.
It's substantial enough to serve as the main event yet adaptable enough to suit different preferences and occasions.
The best part is how much easier the baking method makes everything compared to traditional preparation, saving time and effort while still delivering incredible results.
Anyone can master this recipe with just a little attention to technique and timing.
Serve them at casual gatherings or family dinners, and watch how quickly they disappear from the table.
Crunchy Reasons to Try Chicken Chimichangas
Full Ingredient Overview for Baked Chicken Chimichangas
What Tools Bake Chicken Chimichangas
How to Bake Chicken Chimichangas Until Crispy
Warm Up the Oven
Set your oven to exactly 375°F (190°C). This precise temperature will help create that perfect golden crispiness we’re after.
Create the Filling
Grab a mixing bowl and combine these tasty ingredients:
Stir everything together until the ingredients are well mixed and looking delicious.
Prepare the Tortillas
Lay out your 4 large flour tortillas on a clean surface. Scoop about 1/4 of the filling into the center of each tortilla.
Wrap Like a Pro
Fold the sides of each tortilla towards the center, then roll them up tightly. Think of it like wrapping a neat little flavor package.
Get Ready to Bake
Brush each chimichanga with 1 tablespoon of olive oil. This helps them get that gorgeous golden-brown color.
Arrange for Baking
Place the wrapped chimichangas seam-side down on a baking sheet. Make sure they’re not touching each other.
Bake to Perfection
Slide the baking sheet into the preheated oven. Bake for 25-30 minutes until the tops turn a beautiful golden brown.
Serve and Enjoy
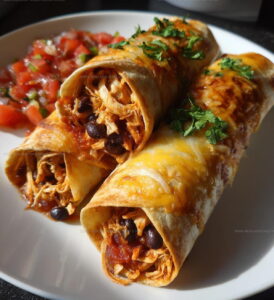
Pull the chimichangas out of the oven and let them cool for a minute. Serve with 1 cup of fresh salsa on the side for dipping.
Kitchen Know-How for Baked Chicken Chimichangas
Baked Chicken Chimichanga Variations With Crunch
Crispy Serving Ideas for Chicken Chimichangas
How to Store Baked Chicken Chimichangas
Baked Chicken Chimichangas Common Q&A
Can I use frozen chicken?
Absolutely! Thaw and shred the chicken completely before mixing with other ingredients to ensure even heating.
What if my tortillas tear?
Wrap them in a damp paper towel and microwave for 15 seconds to make them more flexible and less likely to crack when rolling.
How do I keep the filling from falling out?
Fold the sides in tightly before rolling, and place the chimichangas seam-side down on the baking sheet to seal them.
Are corn or flour tortillas better?
Flour tortillas work best because they’re softer and less likely to break during rolling and baking.
Can vegetarians enjoy this recipe?
Replace chicken with cooked black beans, extra corn, or plant-based protein like tofu crumbles to create a delicious vegetarian version.
What cheese melts best in this recipe?
Monterey Jack or cheddar cheese provide great flavor and melt beautifully inside the chimichangas.
Crispy Oven Chicken Chimichangas Recipe
- Total Time: 35-40 minutes
- Yield: 4 1x
Description
Chicken Chimichangas are my go-to crispy comfort meal that brings serious Mexican-inspired flavor right to your dinner table. Packed with seasoned chicken, wrapped in a golden tortilla, and baked until perfectly crunchy, these chimichangas will definitely become your new favorite weeknight dinner solution.
Ingredients
Proteins:
- 2 cups chicken, shredded
- 1 cup black beans, drained and rinsed
Fillings:
- 1 cup corn
- 1 cup cheese, shredded
- 1 cup salsa
Seasonings and Accessories:
- 1 teaspoon taco seasoning
- 4 large flour tortillas
- 1 tablespoon olive oil
Instructions
- Fire up the oven to 375°F (190°C), preparing a crisp baking surface for your chimichangas.
- Combine 2 cups shredded chicken, 1 cup black beans, 1 cup corn, 1 cup shredded cheese, and 1 teaspoon taco seasoning in a mixing bowl, blending flavors thoroughly.
- Spread ¼ of the mixed filling directly in the center of each large flour tortilla.
- Carefully fold the sides of the tortilla inward, creating a snug package that will hold your delicious filling.
- Roll the tortilla tightly, ensuring the edges are sealed to prevent filling from escaping during baking.
- Brush each chimichanga with 1 tablespoon olive oil, which will help achieve a golden, crispy exterior.
- Arrange the rolled chimichangas seam-side down on a clean baking sheet, giving each one space to crisp evenly.
- Slide the baking sheet into the preheated oven and bake for 25-30 minutes until the tortillas turn a gorgeous golden brown.
- Remove from the oven and let rest for 2-3 minutes before serving with 1 cup of fresh salsa on the side.
Notes
- Swap flour tortillas with whole wheat or gluten-free options to accommodate different dietary needs.
- For extra crispiness, place chimichangas on a wire rack over the baking sheet to allow hot air to circulate.
- Experiment with protein variations like shredded beef, pulled pork, or black beans for vegetarian friends.
- Prepare the filling ahead of time and refrigerate for a quick weeknight dinner that comes together in minutes.
- Prep Time: 10 minutes
- Cook Time: 25-30 minutes
- Category: Baked
- Method: Baking
- Cuisine: Mexican
Nutrition
- Serving Size: 4
- Calories: 370 kcal
- Sugar: 3 g
- Sodium: 550 mg
- Fat: 15 g
- Saturated Fat: 5 g
- Unsaturated Fat: 9 g
- Trans Fat: 0 g
- Carbohydrates: 35 g
- Fiber: 7 g
- Protein: 28 g
- Cholesterol: 50 mg
Daniel Navarro
Culinary Content Director
Expertise
Mexican-inspired Menus, Seasonal Restaurant Specials, Shared Plate Dining, Tequila Pairings, Chef-driven Recipes
Education
Daniel writes about bold flavors, chef-driven dishes, and the kind of restaurant moments that turn tacos, mezcal, and shared plates into a night worth repeating.