
Golden Baked Blooming Onions Recipe with Savory Crunch
Crispy blooming onions have become a beloved appetizer that turns heads at any gathering.
The visual appeal alone makes them worth serving, but the satisfying crunch and savory flavor keep everyone coming back for more.
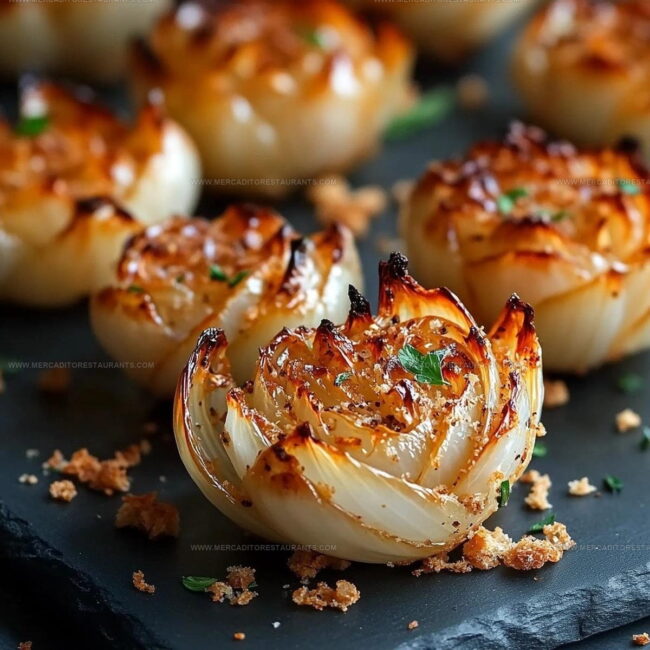
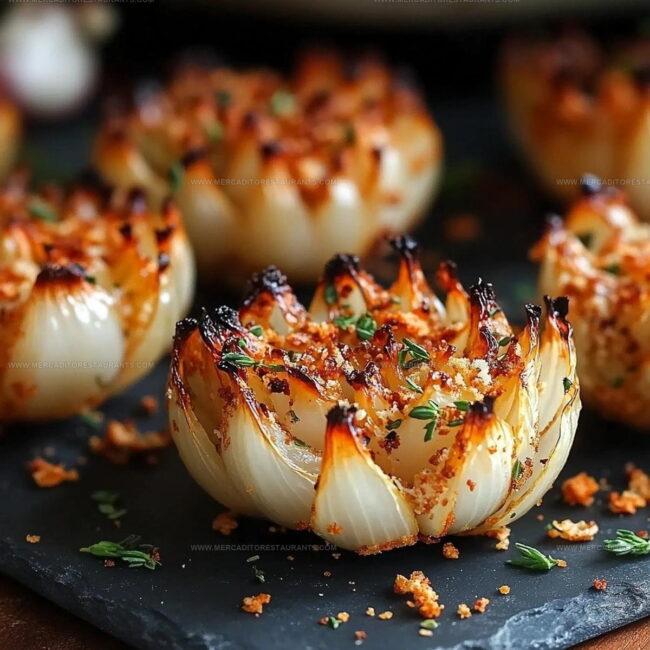
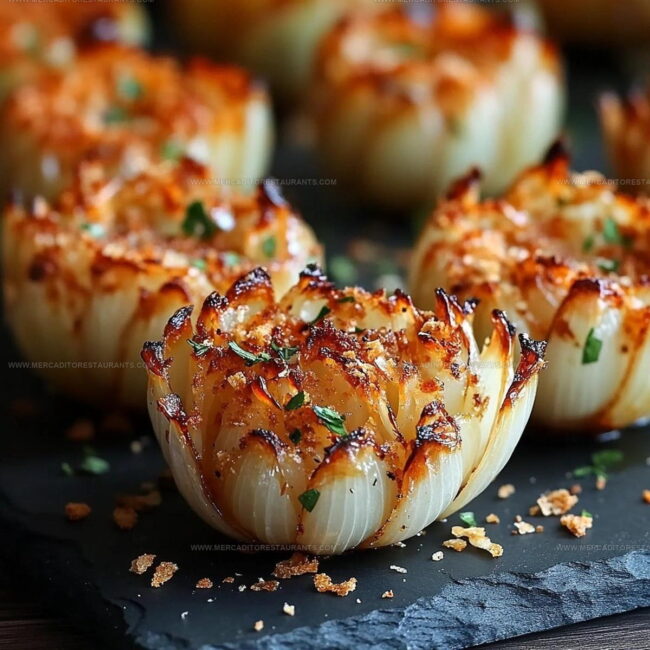
When you cut into one of these golden beauties, it opens up like a flower, revealing countless crispy petals perfect for sharing.
They work equally well as a party starter, game day snack, or restaurant-inspired treat at home.
The combination of textures and flavors creates an experience that feels special without being fussy.
Best of all, they pair beautifully with a variety of dipping sauces to suit different preferences.
Nothing beats pulling apart those crispy layers and enjoying every bite with friends and family.
Why Blooming Onions Are Always Crowd-Pleasers
Ingredient Breakdown for Blooming Onions
Main Ingredients:Supporting Dry Ingredients:Dipping and Seasoning Ingredients:Tools Used for Baked Blooming Onions
Baked Blooming Onions Cooking Method
Warm Up the Oven
Get your oven toasty at exactly 400°F. Grab a baking sheet and either line it with parchment paper or give it a quick spray of cooking oil.
Prepare the Onion
Slice off the top of those sweet Vidalia onions, peeling away the outer skin. Standing the onion root-side down, carefully cut 8-12 even segments, keeping the root intact to hold everything together.
Gently separate those onion petals so they’re ready for breading.
Set Up Breading Bowls
Create three separate bowls.
First Bowl (Flour Mixture):
Second Bowl (Egg Wash):
Third Bowl:
Coat the Onion Petals
Dive into that flour mixture first, making sure each petal gets a good coating. Next, dunk the floured onion into the egg wash, then roll it through the panko breadcrumbs. Press the breadcrumbs gently so they stick like best friends.
Crisp It Up in the Oven
Place your breaded onion on the prepared baking sheet. Give it a generous spray of cooking spray to help it get super crispy. Slide it into the 400°F oven for 25-30 minutes. Halfway through, give the pan a quick spin to ensure even browning.
Whip Up the Dipping Sauce
In a small bowl, mix together:
Stir until everything is smooth and well combined.
Serve and Enjoy
Pull that golden, crispy onion out of the oven and plate it up. Grab your creamy sauce and get ready for some serious snacking!
Practical Notes for Baked Blooming Onions
Blooming Onion Coating Variations
How to Serve Blooming Onions
Blooming Onion Storage After Baking
Baked Blooming Onions Common Questions
Can I use regular breadcrumbs instead of panko?
Regular breadcrumbs work, but panko creates a crunchier texture that makes the blooming onion extra crispy and satisfying.
How do I prevent the breading from falling off?
Ensure each coating layer is thin and press the panko gently but firmly so it adheres well to the onion’s surface.
Are there gluten-free alternatives for this recipe?
Swap regular flour with gluten-free flour and use gluten-free panko or crushed gluten-free crackers for a similar crispy result.
Can the blooming onion be made ahead of time?
For best results, prepare and bake right before serving to maintain maximum crispness and temperature.
What if my onion doesn’t bloom perfectly?
Gently separate the petals after cutting, and be careful not to slice completely through the root end to keep the onion together.
How spicy is the dipping sauce?
The hot sauce adds a mild kick, but you can adjust the amount to make it more or less spicy according to your preference.

Crispy Baked Blooming Onions Recipe
- Total Time: 40-45 minutes
- Yield: 4 1x
Description
Blooming onions bring serious crispy magic straight to your dinner table, turning simple ingredients into a crowd-pleasing appetizer that disappears faster than you can plate it. Baked until golden and crunchy, these onion petals deliver maximum flavor with minimal kitchen effort.
Ingredients
Main Ingredients:
- 2 large sweet onions
- 2 large eggs
- 1 cup panko breadcrumbs
Supporting Dry Ingredients:
- ½ cup all-purpose flour
- 1 teaspoon paprika
- 1 teaspoon garlic powder
- 1 teaspoon onion powder
- ½ teaspoon salt
- ½ teaspoon black pepper
- ½ teaspoon cayenne pepper
Dipping and Seasoning Ingredients:
- ¼ cup milk
- ½ cup mayonnaise
- ¼ cup sour cream
- 1 tablespoon ketchup
- 1 teaspoon hot sauce
- ½ teaspoon paprika
- ½ teaspoon garlic powder
- ¼ teaspoon salt
- Cooking spray
Instructions
- Preheat your oven to 400°F and prepare a baking sheet with parchment paper or a light spray of cooking oil.
- Trim the top of the sweet onions while keeping the root intact. Carefully slice the onion into 8-12 even segments without cutting through the root, then gently separate the petals.
- Create three separate breading stations: Mix ½ cup flour with 1 teaspoon each of paprika, garlic powder, onion powder, plus ½ teaspoon salt, black pepper, and optional cayenne in the first bowl.
- Whisk 2 large eggs with ¼ cup milk in the second bowl until completely combined.
- Pour 1 cup panko breadcrumbs into the third bowl for your final coating station.
- Thoroughly coat each onion petal in the seasoned flour, ensuring complete coverage between the layers.
- Dip the floured onion into the egg mixture, allowing excess to drip off before transferring to the breadcrumb bowl.
- Gently press panko crumbs onto the onion, creating an even, crispy exterior that adheres well.
- Place the breaded onion on the prepared baking sheet and spray generously with cooking spray.
- Bake for 25-30 minutes at 400°F, rotating the pan halfway through to ensure even browning.
- While baking, combine ½ cup mayonnaise, ¼ cup sour cream, 1 tablespoon ketchup, and optional hot sauce in a small mixing bowl.
- Stir in ½ teaspoon paprika, ½ teaspoon garlic powder, and ¼ teaspoon salt into the dipping sauce.
- Remove the onion from the oven when golden and crispy, then serve immediately with the prepared sauce.
Notes
- Ensure your onion segments stay connected at the root to create that classic blooming effect when baking.
- Shake off excess flour and breadcrumbs to prevent clumpy coating that won’t crisp properly.
- For gluten-free version, swap regular flour with almond or rice flour and use gluten-free panko breadcrumbs.
- Freezing the breaded onion for 15 minutes before baking helps the coating adhere better and creates a crunchier exterior.
- Prep Time: 15 minutes
- Cook Time: 25-30 minutes
- Category: Baked
- Method: Baking
- Cuisine: American
Nutrition
- Serving Size: 4
- Calories: 255 kcal
- Sugar: 5 g
- Sodium: 430 mg
- Fat: 18 g
- Saturated Fat: 3.5 g
- Unsaturated Fat: 13 g
- Trans Fat: 0.1 g
- Carbohydrates: 16 g
- Fiber: 2 g
- Protein: 4 g
- Cholesterol: 70 mg
Isabella Romero
Hospitality & Beverage Editor
Expertise
Cocktail Culture, Tequila and Mezcal Knowledge, Guest Experience Writing, Restaurant Trends, Event Dining Guides
Education
- Program: B.A. in Hospitality Management
- Focus: Studied hospitality through a program built around theory and application, with practical preparation for restaurant and guest-experience careers in Chicago’s hospitality industry.
Wine & Spirit Education Trust (WSET)Isabella brings together cocktails, food culture, social dining, and the thoughtful details that make a meal feel memorable. Her content blends atmosphere, flavor, and hospitality in a warm, polished style that helps readers connect with the full dining experience, from the first sip to the last bite.