
Crispy Buttermilk Ranch Oven Fried Chicken Recipe
Buttermilk Ranch Oven Fried Chicken unlocks all the satisfaction of traditional fried chicken without the mess and extra oil.
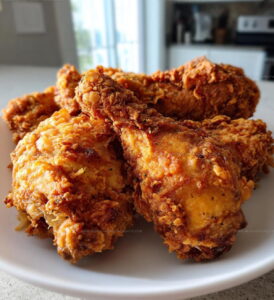
Crispy on the outside and juicy within, it's become a weeknight favorite in homes everywhere because it simplifies what once felt complicated.
The ranch seasoning adds a familiar flavor that appeals to almost everyone at the table.
Baking instead of frying means less cleanup and more time to relax while dinner cooks.
Comfort food doesn't have to mean hours in the kitchen or a sink full of greasy pans.
When hunger strikes and something satisfying sounds perfect, having a reliable option that feels special makes all the difference.
If comforting meals that come together easily sound appealing, this recipe won't disappoint.
Why You Should Try Buttermilk Ranch Oven Fried Chicken
Buttermilk Ranch Oven Fried Chicken Ingredient Breakdown
Chicken Base:Marinade:Coating:Seasoning Blend:Which Tools Are Needed for Buttermilk Ranch Oven Chicken?
How to Prepare Buttermilk Ranch Oven-Fried Chicken
Preheat the Oven
Set your oven to exactly 400 degrees Fahrenheit. This precise temperature will help create that perfect crispy exterior on the chicken.
Create Buttermilk Marinade
Grab a medium bowl and mix together 1 cup buttermilk and 2 tablespoons ranch seasoning until well combined. The seasoning will infuse delicious flavor into the chicken.
Marinate the Chicken
Drop 4 chicken thighs and 4 chicken drumsticks into the buttermilk mixture. Let them soak and get super tasty for at least 1 hour in the refrigerator. The longer they sit, the more flavor they’ll absorb.
Prepare Crispy Coating
In a separate bowl, whip up your crunchy coating with these ingredients:
Mix everything together thoroughly so each spice is evenly distributed.
Coat the Chicken
Pull the chicken from the buttermilk, letting excess liquid drip off. Roll each piece in the seasoned breadcrumb mixture, making sure every nook and cranny gets a good coating.
Arrange for Baking
Spread a piece of parchment paper on a baking sheet. Arrange the coated chicken pieces with some space between them so they can get nice and crispy.
Bake to Perfection
Slide the baking sheet into the preheated oven. Bake for 35-40 minutes. The chicken is done when it turns a beautiful golden brown and reaches an internal temperature of 165 degrees Fahrenheit.
Helpful Notes for Crispy Ranch-Style Chicken
Ranch Oven Fried Chicken Crispy Variations
How to Serve Buttermilk Ranch Oven Fried Chicken
How to Store Buttermilk Ranch Oven Fried Chicken
Buttermilk Ranch Oven Fried Chicken Q&A
Can I use chicken breasts instead of other chicken parts?
Absolutely! Chicken breasts work perfectly. Just adjust baking time slightly to ensure they cook through without drying out.
Is buttermilk essential for this recipe?
Buttermilk tenderizes the chicken and helps create a super crispy coating. If you don’t have buttermilk, mix regular milk with a tablespoon of vinegar as a substitute.
How do I know the chicken is fully cooked?
Use a meat thermometer to check that the internal temperature reaches 165°F (74°C). The chicken should look golden brown and feel firm when touched.
Can I make this recipe gluten-free?
Replace regular breadcrumbs with gluten-free breadcrumbs or crushed gluten-free crackers to make the recipe safe for those with gluten sensitivities.
What if I don’t have ranch seasoning mix?
Create your own by mixing dried dill, dried chives, garlic powder, onion powder, salt, and pepper to achieve a similar flavor profile.
How long should chicken marinate in the buttermilk?
For best results, let chicken soak in the buttermilk mixture for at least one hour, but overnight marinating will create even more tender meat.
Buttermilk Ranch Oven Fried Chicken Recipe
- Total Time: 1 hour 50 minutes to 1 hour 55 minutes
- Yield: 4 1x
Description
Buttermilk ranch oven fried chicken comes out crispy and golden when you coat your chicken in a seasoned buttermilk mixture before baking. Crunchy, flavorful, and way healthier than deep frying, this dish delivers restaurant-quality chicken right from your home kitchen.
Ingredients
Main Protein:
- 4 chicken thighs
- 4 chicken drumsticks
Coating and Seasoning:
- 1 cup breadcrumbs
- 1 tablespoon ranch seasoning
- 1 teaspoon garlic powder
- 1 teaspoon onion powder
- 1 teaspoon paprika
- Salt to taste
- Pepper to taste
Liquid:
- 1 cup buttermilk
Instructions
- Warm your oven to exactly 400°F and position the rack in the center for even cooking.
- Whisk 1 cup buttermilk with 2 tablespoons ranch seasoning in a medium bowl until thoroughly combined.
- Submerge chicken thighs and drumsticks completely in the buttermilk mixture, ensuring each piece is saturated. Refrigerate for minimum 1 hour.
- Prepare your breading station by mixing 1 cup breadcrumbs with 1 teaspoon each of garlic powder, onion powder, and paprika. Add a pinch of salt and pepper for extra seasoning.
- Lift chicken pieces from buttermilk, allowing excess liquid to drip back into the bowl.
- Roll each chicken piece in the seasoned breadcrumb mixture, pressing gently to help crumbs adhere completely.
- Arrange breaded chicken on a parchment-lined baking sheet, spacing pieces about 1 inch apart to ensure crispy edges.
- Bake chicken for precisely 35-40 minutes at 400°F until the exterior turns deep golden brown and internal temperature reaches 165°F.
Notes
- Let the chicken marinate longer for deeper flavor, up to 24 hours in the refrigerator for maximum tenderness.
- Ensure breadcrumbs are evenly distributed and pressed firmly onto chicken for a crispy, golden coating.
- Use a meat thermometer to check internal temperature reaches 165F for perfectly safe, juicy chicken.
- For gluten-free version, swap regular breadcrumbs with crushed gluten-free crackers or almond flour.
- Prep Time: 1 hour 15 minutes
- Cook Time: 35-40 minutes
- Category: Oven-Fried
- Method: Baking
- Cuisine: American
Nutrition
- Serving Size: 4
- Calories: 450 kcal
- Sugar: 2 g
- Sodium: 600 mg
- Fat: 25 g
- Saturated Fat: 6 g
- Unsaturated Fat: 15 g
- Trans Fat: 0.1 g
- Carbohydrates: 20 g
- Fiber: 2 g
- Protein: 35 g
- Cholesterol: 110 mg
Daniel Navarro
Culinary Content Director
Expertise
Mexican-inspired Menus, Seasonal Restaurant Specials, Shared Plate Dining, Tequila Pairings, Chef-driven Recipes
Education
Daniel writes about bold flavors, chef-driven dishes, and the kind of restaurant moments that turn tacos, mezcal, and shared plates into a night worth repeating.